phone

    • chevron_right

      Ignite Realtime Blog: Presence Service plugin v1.7.2 release

      news.movim.eu / PlanetJabber · Friday, 19 January, 2024 - 14:53

    The Presence Service plugin is a plugin for Openfire. It provides a service that provides simple presence information over HTTP. It can be used to display an online status icon for a user or component on a web page or to poll for presence information from a web service.

    A new release is now available for this plugin: version 1.7.2.

    In this release, an incompatibility with the recently released Openfire 4.8.0 was fixed. Also, a reportedly infrequent issue with loading images has been addressed.

    The update should be visible in the Plugins section of your Openfire admin console within the next few days. You can also download it from the plugin’s archive page .

    For other release announcements and news follow us on Mastodon or X

    1 post - 1 participant

    Read full topic

    • chevron_right

      Snikket: Snikket Server - January 2024 release

      news.movim.eu / PlanetJabber · Wednesday, 10 January, 2024 - 00:00 · 6 minutes

    🎉 It’s here! We’re happy to introduce the January 2024 Snikket Server release.

    This is the core software of the Snikket project - a self-hostable “personal messaging server in a box”. If you wish for something like Messenger, WhatsApp or Signal, but not using their servers, Snikket is for you. Once deployed, you can create invitation links for family, friends, colleagues… any kind of social group is a good fit for Snikket. The invitation links walk people through downloading the Snikket app and joining your private Snikket instance.

    What’s new in this release?

    Changes to Circles

    While Snikket is designed for groups of people to easily communicate with each other, we know that often people have multiple social groups. Our Circles feature allows the admin of the Snikket instance to decide which people will see each other within the Snikket apps, by grouping them into “circles”. For example, you could use this to separate your family from your friends, even within the same Snikket instance.

    In previous releases, the Snikket server automatically created a group chat, and added everyone in the circle to that chat automatically. We received a lot of feedback that these chats were either not really used, or sometimes confusing (for example, because they are managed automatically by the server and you cannot manage them yourself within the Snikket app). Other people liked the group chats, but wished that more than one could be made!

    In this new release, creating a circle will no longer create a group chat automatically. However you can also now create as many “circle chats” as you want, and give them individual names. This can be useful for creating per-topic chats for all members of a circle.

    Of course if you just want normal private group chats, you can still create those within the Snikket app as usual, and manage the group yourself.

    Last activity display

    Sometimes people drop off Snikket, intentionally or unintentionally. For example, if they get a new phone and forget to reinstall the app or have problems connecting. In the web interface you can now see when the user was last active.

    You can use this information to clean up unused accounts, or reach out to people who might need help regaining access to their account.

    Connectivity and security

    We have made a number of connectivity improvements. Snikket now enables IPv6 by default (previously it had to be enabled manually). If you don’t have IPv6, that’s fine… thanks to new changes we have made, Snikket will now adapt automatically to network conditions and connect using the best method that works. We expect IPv6-only networks to become increasingly common in the years ahead, so if your server is not currently set up for IPv6, consider doing that.

    The new release now also supports DNSSEC and DANE 🔒, both of these are used to improve connection security. Currently these are disabled by default, however, because Snikket does not know if your system’s DNS resolver actually supports DNSSEC. We may enable it automatically in future releases if Snikket can determine that reliably. For now, it’s opt-in .

    Faster and stronger authentication

    We’ve also been working on optimizing and strengthening app-to-server authentication. A lot of this work was funded by NGI0+NLnet and is available in our sister project, Prosody. You can read more details in the blog post Bringing FASTer authentication to Prosody and XMPP .

    Snikket already supported a neat security measure called “channel binding”, but it previously only worked over TLS 1.2 connections. TLS 1.3 usage has increased rapidly in recent years, and we now support channel binding on TLS 1.3 connections too. Channel binding prevents machine-in-the-middle attacks if the TLS certificate is compromised somehow.

    All these features help protect against certain kinds of attack that were deemed unlikely until recently .

    Dropping older security protocols

    Mainly for compatibility reasons, Snikket previously supported an authentication mechanism where the client sends the user’s password to the server, but only over TLS-encrypted connections. This is how almost all website login forms work today, from your webmail to your online banking. However the Snikket apps actually use a more secure login method , which has many additional security features that you won’t find on most other online services.

    Prioritizing security over compatibility, we have decided to disable less secure mechanisms entirely. If you use your Snikket account with third-party XMPP apps, bots or utilities that are not up to date with modern best practices, this may affect you.

    Similarly, we have again reviewed and updated the TLS versions and ciphers that Snikket supports, in line with Mozilla’s recommendations , as we do in every release. This change also has the potential to affect connectivity from some very old apps and devices.

    Easy account restoration

    The Snikket apps, as well as many third-party apps, allow people to delete their Snikket account from within the app.

    However, as the number of Snikket users has grown, so have reports from people who accidentally deleted their account! This can be due to confusion - e.g. intending to remove the account from the app, rather than removing it from the server. A number of these cases were due to confusing or buggy third-party apps. It doesn’t happen very often, but it was happening too often.

    Of course, deleted accounts can be restored from backups (which you have, of course 😇) - but it was a complex time-consuming process to selectively restore a single account without rolling back everyone else’s data.

    In this release, when a request is received from an app to delete a user’s account, the server will lock the account and schedule its deletion in 7 days (or whatever the server’s data retention time is set to). During this time, the account can be restored easily from the web interface if it turns out to have been a mistake.

    Farewell to the welcome message

    In previous releases, new accounts would receive an auto-generated “welcome message” from the server. This had a number of issues , and we have decided to remove it for now. Instead we will work on integrating any “welcome” functionality directly into the apps.

    Languages and translations

    Many languages received updates in this release, including French, German, Indonesian, Polish, Italian and Swedish.

    We added support for two additional languages: Russian and Ukranian.

    Many thanks to all translators for their help with this effort!

    Our last major release was made just weeks before the Russian invasion of Ukraine shocked the world. We would like to take this opportunity to bring to mind that this sad situation is ongoing. It directly affects some of the contributors and users of our project, and many individuals, families and communities. Please consider what you can do to help them.

    Other changes

    We only listed a handful of the main features here. The reality is that beneath the hood, we have made a large number of changes to improve security, performance and reliability. And we have in place the foundations for other exciting things we have in the pipeline!

    Installing and upgrading

    Choose your adventure:

    • If you’re new to Snikket, you can head straight to the setup guide for instructions on how to get started.

    • To upgrade an existing self-hosted instance to the new release, read the upgrading guide .

    • Customers on our hosting platform can expect the new release to be rolled out soon, we’ll be in touch! If you have any questions, you can contact support .

    Happy chatting!

    P.S. If you’re planning to be at FOSDEM in a few weeks, we’ll be there, come and say hi! We’d love to meet you :)

    • wifi_tethering open_in_new

      This post is public

      snikket.org /blog/snikket-server-jan-2024-release/

    • chevron_right

      The XMPP Standards Foundation: XMPP Summit 26

      news.movim.eu / PlanetJabber · Friday, 5 January, 2024 - 00:00 · 1 minute

    The XMPP Standards Foundation (XSF) will hold its 26th XMPP Summit in Brussels, Belgium this year again! These are the two days preceding FOSDEM 2024 . The XSF invites everyone interested in development of the XMPP protocol to attend, and discuss all things XMPP in person and remote!

    Time & Address

    The venue will take place at the Thon Hotel EU including coffee break (from 08:30 o’clock) and lunch (12:00 to 14:00 o’clock) paid by the XSF in the hotel restaurant.

    Date: Thursday 1st - Friday 2nd February 2024 Time: 09:00 - 17:00 o’clock (CET) (both days)

    Thon Hotel EU
    Room: FRANCE
    Wetstraat / Rue de la Loi 75
    1040 Brussels
    Openstreetmap

    Furthermore, the XSF will have its dinner Thursday night which is paid for XSF members. Everyone else is of course invited to participate, however at their own expense. Please reach out if you are participating as a non-member (see list below).

    Participation

    So that we can make final arrangements with the hotel, you must register before Monday 15th January 2024!

    Please note that, although we welcome everyone to join, you must announce your attendance beforehand, as the venue is not publicly accessible. If you’re interested in attending, please make yourself known by filling out your details on the wiki page for Summit 26 . To edit the page, reach out to an XSF member to enter and update your details or you’ll need a wiki account, which we’ll happily provide for you. Reach out in the XSF public chatroom . When you sign-up please book the accomodation and your travel. Please also unsign if you will not attend anymore.

    Please also consider signing up if you plan to:

    Communication

    To ensure you receive all the relevant information, updates and announcements about the event, make sure that you’re signed up to the Summit mailing list and the Summit chatroom .

    Spread the word also via our communication channels such as Mastodon and Twitter .

    Sponsors

    We would like to kindly thank the direct sponsors for the event which are so far Isode , Snikket and the two individuals of Alexander Gnauck and Edward Maurer. We appreciate their support so that we can keep the event open and accessible for everyone.

    We are really excited seeing so many people already signing up. Looking forward to meeting all of you!

    The XMPP Standards Foundation

    • wifi_tethering open_in_new

      This post is public

      xmpp.org /2024/01/xmpp-summit-26/

    • chevron_right

      Ignite Realtime Blog: Happy Birthday, Jabber!

      news.movim.eu / PlanetJabber · Thursday, 4 January, 2024 - 14:53

    Today marks the 25th birthday of Jeremie Miller’s announcement of “a new project to create a complete open-source platform for Instant Messaging” on Slashdot.

    How have things progressed since then!

    By far most of the projects that we maintain here in the IgniteRealtime.org community make direct use of the XMPP protocol, which is the name used for the IETF standards based on the Jabber technology, and we’re still going strong.

    With countless different people and organisations creating and using XMPP applications, even today, it has truly proven itself to be a rock-sold, tried and tested, versatile protocol. It’s not often that so much development happens around a technology that’s older than … well, some of us!

    Happy birthday, Jabber!

    1 post - 1 participant

    Read full topic

    • chevron_right

      The XMPP Standards Foundation: XMPP at FOSDEM 2024

      news.movim.eu / PlanetJabber · Thursday, 4 January, 2024 - 00:00 · 1 minute

    We’re very excited to be back at FOSDEM in person in 2024. Once again, many members of the XSF and the XMPP community will be attending, and we hope to see you there!

    Realtime Lounge

    As usual, we will host the Realtime Lounge , where you can come and meet community members, project developers, see demos and ask us questions. We’ll be in our traditional location - find us on the K building 2nd floor, beside the elevator (map below). Come and say Hi! Yes, we got stickers :-)

    Map of the K building level 2

    Map of the K building level 2

    Talks

    There are talks in the Real Time Communications devroom that relate to XMPP. These are so far:

    • Bridging Open Protocols: XMPP and ActivityPub Gateway via Libervia . In this session, we’ll explore the architecture of this gateway, detailing how it facilitates communication between XMPP and ActivityPub. We’ll delve into the intricacies of protocol mapping and discuss how Libervia integrates features such as microblogging, reactions, likes/favorites, mentions, and calendar events across these platforms.

    XMPP Summit 26

    Prior to FOSDEM, the XSF will also hold its 26th XMPP summit . This is where community members gather to discuss protocol changes and exchange within the developer community. We’ll be reporting live from the event and also from FOSDEM.

    Spread the word

    Please share the news on other networks:

    • wifi_tethering open_in_new

      This post is public

      xmpp.org /2024/01/xmpp-at-fosdem-2024/

    • chevron_right

      XMPP Providers: XMPP Providers Fully Automated

      news.movim.eu / PlanetJabber · Friday, 29 December, 2023 - 00:00 · 2 minutes

    Automate all the Things

    During the past year, the team behind the XMPP Providers project worked on automating the process of gathering data about XMPP providers. Automating this process reduces manual work significantly (for example, checking websites by hand, verifying information, listing sources, etc.) and helps to sustain the team’s efforts. Automation also enables the project to be up to date – every day!

    Last month , the project reached a state that allowed the suite of tools to automatically query many provider properties via XMPP and HTTP. All of these tools are working together in a GitLab pipeline running daily to keep the data up to date.

    API v2

    Much of the work needed to be done manually previously. After automating it, some provider properties did not seem fitting anymore. Thus, we changed them. While automating the process, additional properties were added because they were available through the tools.

    Changed Properties

    • lastCheck has been replaced by latestUpdate specifying when at least one provider property changed since checks now run daily.
    • company has been replaced by organization allowing for a finer distinction of an organization’s type.

    New Properties

    • alternativeJids : A list of JIDs a provider offers for registration other than the main JID.
    • serverTesting : Whether tests against the provider’s server are allowed (e.g., certificate checks and uptime monitoring).
    • inBandRegistrationEmailAddressRequired : Whether an email address is required for registering an account.
    • inBandRegistrationCaptchaRequired : Whether a CAPTCHA is needed to be solved for registering an account.

    The FAQ section explains how these properties can be provided by server admins.

    Provider Files for More Automation

    There are properties that should be provided by the XMPP server instead of retrieving them via other methods. To enable automatic collection of those properties via XMPP, the team works on extending existing standards and, if necessary, creating new ones.

    Until standards have been extended or created, and until those changes have been implemented and deployed in the wild, a provider file shall fill the gap. A provider file is a JSON file containing only the provider properties that cannot be retrieved via other methods. Each provider can generate a provider file and supply it via its web server.

    To make this as easy as possible, a Provider File Generator has been developed. It generates a provider file from the information you enter in the form.

    As soon as a provider file is discovered by the tools, all properties listed in the provider file are automatically fetched and processed.

    Spread the Word

    The project lives from the community and client implementations, so follow us and spread the word !

    XMPP Providers Logo

    XMPP Providers Logo

    • wifi_tethering open_in_new

      This post is public

      providers.xmpp.net /blog/2023-12-29-xmpp-providers-fully-automated/

    • chevron_right

      Ignite Realtime Blog: CVE-2023-32315: Openfire vulnerability (update)

      news.movim.eu / PlanetJabber · Monday, 28 August, 2023 - 08:21 · 2 minutes

    A few months ago, we published details about an important security vulnerability in Openfire that is identified as CVE-2023-32315.

    To summarize: Openfire’s administrative console (the Admin Console), a web-based application, was found to be vulnerable to a path traversal attack via the setup environment. This permitted an unauthenticated user to access restricted pages in the Openfire Admin Console reserved for administrative users.

    Leveraging this, a malicious actor can gain access to all of Openfire, and, by extension (through installing custom plugins), much of the infrastructure that is used to run Openfire. The Ignite Realtime community has made available new Openfire releases in which the issue is addressed, and published various mitigation strategies for those who cannot immediately apply an update. Details can be found in the security advisory that we released back in May.

    In the last few days, this issue has seen a considerable increase in exposure: there have been numerous articles and podcasts that discuss the vulnerability. Many of these seem to refer back to a recent blogpost by Jacob Banes at Vulncheck.com , and those that do not seem to include very similar content.

    Many of these articles point out that there’s a “new way” to exploit the vulnerability. We indeed see that there are various methods being used, in the wild, in which this vulnerability is abused. Some of these methods leave less traces than others, but the level of access that can be obtained through each of each of these methods is pretty similar (and, sadly, similarly severe).

    Given the renewed attention, we’d like to make clear that there is no new vulnerability in Openfire. The issue, solutions and mitigations that are documented in the original security advisory are still accurate and up to date.

    Malicous actors use a significant amount of automation. By now, it’s almost safe to assume that your instance has been compromised if you’re running an unpatched instance of Openfire that has its administrative console exposed to the unrestricted internet. Tell-tale signs are high CPU loads (of crypto-miners being installed) and the appearance of new plugins (which carry the malicious code), but this by no means is true for every system that’s compromised.

    We continue to urge everyone to update Openfire to its last release, and carefully review the security advisory that we released back in May, to apply applicable mitigations where possible.

    For other release announcements and news follow us on Twitter and Mastodon .

    1 post - 1 participant

    Read full topic

    • chevron_right

      Erlang Solutions: Ship RabbitMQ logs to Elasticsearch

      news.movim.eu / PlanetJabber · Thursday, 27 July, 2023 - 10:01 · 3 minutes

    RabbitMQ is a popular message broker that facilitates the exchange of data between applications. However, as with any system, it’s important to have visibility into the logs generated by RabbitMQ to identify issues and ensure smooth operation. In this blog post, we’ll walk you through the process of shipping RabbitMQ logs to Elasticsearch, a distributed search and analytics engine. By centralising and analysing RabbitMQ logs with Elasticsearch, you can gain valuable insights into your system and easily troubleshoot any issues that arise.

    Logs processing system architecture

    To build that architecture, we’re going to set up 4 components in our system. Each one of them has got its own set of features. Here there are:

    • A logs Publisher
    • A RabbitMQ Server With a Queue To Publish data to and receive data from.
    • A Logstash Pipeline To Process Data From The RabbitMQ Queue.
    • An Elasticsearch Index To Store The Processed Logs.
    Components of building logs

    Installation

    1. Logs Publisher

    Logs can come from any software. It can be from a web server (Apache, Nginx), a monitoring system, an operating system, a web or mobile application, and so on. The logs give information about the working history of any software.

    If don’t have any choices yet, you can use my simple stuff here: https://github.com/baoanh194/rabbitmq-simple-publisher-consumer

    2. RabbitMQ

    The logs publisher will be publishing the logs to a RabbitMQ queue.

    Instead of going through a very long RabbitMQ installation, we’re going to go with a RabbitMQ Docker instance to make things simple. You can find your preferred operating system here: https://docs.docker.com/engine/install/

    To start a RabbitMQ container. You can do this by running the following command:

    RabbitMQ container command

    This command starts a RabbitMQ container with the management plugin enabled. After enabling the plugin, you can access the RabbitMQ management console by going to http://localhost:15672/ in your web browser. Normally the username/password is guest/guest .

    RabbitMQ container

    3. Elasticsearch

    Go and check this link to install and configure Elasticsearch: https://www.elastic.co/guide/en/elasticsearch/reference/current/install-elasticsearch.html

    To store RabbitMQ data for visualisation in Kibana, you need to start an Elasticsearch container. You can do this by running the following command (I’m using Docker to set up Elasticsearch):

    Elasticsearch comand

    When you start Elasticsearch for the first time, there are some security configuration required.

    4. Logstash

    If you haven’t installed or worked with Logstash before, don’t worry. Have a look at the Elastic docs: https://www.elastic.co/guide/en/logstash/current/installing-logstash.html

    It’s very detailed and easy to read.

    For me, I installed Logstash on MacOS by Homebrew:

    Logstash on MacOS

    Once Logstash is installed on your machine, let’s create the Pipeline to process data.

    Paste the code below to your pipelines.conf file:

    (Put new config file under: /opt/homebrew/etc/logstash)

    Pipeline on Logstash

    Run your pipeline with Logstash:

    Run pipeline in Logstash

    Here is a screenshot of what you should get if your RabbitMQ Docker Instance is running well and everything works pretty well on your Logstash pipeline side:

    Logstash Pipeline

    Let’s ship some logs

    Now everything is ready. Go to the logs publisher root folder and run the send.js script

    send.js script

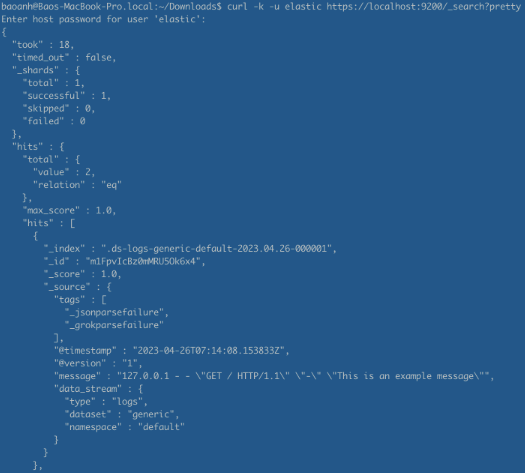
    You can check  the data is sent to Elastic:

    curl -k -u elastic https://localhost:9200/_search?pretty

    If everything goes well, you will get the result as below screenshot:

    Elastic

    Configure Kibana to Visualize RabbitMQ Data

    Additionally, you can configure Kibana to visualize the RabbitMQ data on Elastic. By configuring Kibana, you can create visualisations such as charts, graphs, and tables that make it easy to understand the data and identify trends or anomalies. For example, you could create a chart that shows the number of messages processed by RabbitMQ over time, or a table that shows the top senders and receivers of messages.

    Kibana also allows you to build dashboards, which are collections of visualisations and other user interface elements arranged on a single screen. Dashboards can be shared with others in your organization, making it easier for team members to collaborate and troubleshoot issues. You can refer to this link for how to set up Kibana: https://www.elastic.co/pdf/introduction-to-logging-with-the-elk-stack

    Conclusion

    In summary, shipping RabbitMQ logs to Elasticsearch offers benefits such as centralized log storage, quick search and analysis, and improved system troubleshooting. By following the steps outlined in this blog post, you can set up a system to handle large volumes of logs and gain real-time insights into your messaging system. Whether you’re running a small or large RabbitMQ instance, shipping logs to Elasticsearch can help you optimise and scale your system.

    The post Ship RabbitMQ logs to Elasticsearch appeared first on Erlang Solutions .

    • chevron_right

      Paul Schaub: PGPainless meets the Web-of-Trust

      news.movim.eu / PlanetJabber · Tuesday, 25 July, 2023 - 14:02 · 7 minutes

    We are very proud to announce the release of PGPainless-WOT , an implementation of the OpenPGP Web of Trust specification using PGPainless.

    The release is available on the Maven Central repository .

    The work on this project begun a bit over a year ago as an NLnet project which received funding through the European Commission’s NGI Assure program . Unfortunately, somewhere along the way I lost motivation to work on the project, as I failed to see any concrete users. Other projects seemed more exciting at the time.

    Fast forward to end of May when Wiktor reached out and connected me with Heiko, who was interested in the project. We two decided to work together on the project and I quickly rebased my – at this point ancient and outdated – feature branch onto the latest PGPainless release. At the end of June, we started the joint work and roughly a month later today, we can release a first version 🙂

    Big thanks to Heiko for his valuable contributions and the great boost in motivation working together gave me 🙂
    Also big thanks to NLnet for sponsoring this project in such a flexible way.
    Lastly, thanks to Wiktor for his talent to connect people 😀

    The Implementation

    We decided to write the implementation in Kotlin. I had attempted to learn Kotlin multiple times before, but had quickly given up each time without an actual project to work on. This time I stayed persistent and now I’m a convinced Kotlin fan 😀 Rewriting the existing codebase was a breeze and the line count drastically reduced while the amount of syntactic sugar which was suddenly available blow me away! Now I’m considering to steadily port PGPainless to Kotlin. But back to the Web-of-Trust.

    Our implementation is split into 4 modules:

    • pgpainless-wot parses OpenPGP certificates into a generalized form and builds a flow network by verifying third-party signatures. It also provides a plugin for pgpainless-core .
    • wot-dijkstra implements a query algorithm that finds paths on a network. This module has no OpenPGP dependencies whatsoever, so it could also be used for other protocols with similar requirements.
    • pgpainless-wot-cli provides a CLI frontend for pgpainless-wot
    • wot-test-suite contains test vectors from Sequoia PGP’s WoT implementation

    The code in pgpainless-wot can either be used standalone via a neat little API, or it can be used as a plugin for pgpainless-core to enhance the encryption / verification API:

    /* Standalone */
    Network network = PGPNetworkParser(store).buildNetwork();
    WebOfTrustAPI api = new WebOfTrustAPI(network, trustRoots, false, false, 120, refTime);
    
    // Authenticate a binding
    assertTrue(
        api.authenticate(fingerprint, userId, isEmail).isAcceptable());
    
    // Identify users of a certificate via the fingerprint
    assertEquals(
        "Alice <alice@example.org>",
        api.identify(fingerprint).get(0).getUserId());
    
    // Lookup certificates of users via userId
    LookupAPI.Result result = api.lookup(
        "Alice <alice@example.org>", isEmail);
    
    // Identify all authentic bindings (all trustworthy certificates)
    ListAPI.Result result = api.list();
    
    
    /* Or enhancing the PGPainless API */
    CertificateAuthorityImpl wot = CertificateAuthorityImpl
        .webOfTrustFromCertificateStore(store, trustRoots, refTime)
    
    // Encryption
    EncryptionStream encStream = PGPainless.encryptAndOrSign()
        [...]
        // Add only recipients we can authenticate
        .addAuthenticatableRecipients(userId, isEmail, wot)
        [...]
    
    // Verification
    DecryptionStream decStream = [...]
    [...]  // finish decryption
    MessageMetadata metadata = decStream.getMetadata();
    assertTrue(metadata.isAuthenticatablySignedBy(userId, isEmail, wot));

    The CLI application pgpainless-wot-cli mimics Sequoia PGP’s neat sq-wot tool, both in argument signature and output format. This has been done in an attempt to enable testing of both applications using the same test suite.

    pgpainless-wot-cli can read GnuPGs keyring, can fetch certificates from the Shared OpenPGP Certificate Directory (using pgpainless-cert-d of course :P) and ingest arbitrary .pgp keyring files.

    $ ./pgpainless-wot-cli help     
    Usage: pgpainless-wot [--certification-network] [--gossip] [--gpg-ownertrust]
                          [--time=TIMESTAMP] [--known-notation=NOTATION NAME]...
                          [-r=FINGERPRINT]... [-a=AMOUNT | --partial | --full |
                          --double] (-k=FILE [-k=FILE]... | --cert-d[=PATH] |
                          --gpg) [COMMAND]
      -a, --trust-amount=AMOUNT
                             The required amount of trust.
          --cert-d[=PATH]    Specify a pgp-cert-d base directory. Leave empty to
                               fallback to the default pgp-cert-d location.
          --certification-network
                             Treat the web of trust as a certification network
                               instead of an authentication network.
          --double           Equivalent to -a 240.
          --full             Equivalent to -a 120.
          --gossip           Find arbitrary paths by treating all certificates as
                               trust-roots with zero trust.
          --gpg              Read trust roots and keyring from GnuPG.
          --gpg-ownertrust   Read trust-roots from GnuPGs ownertrust.
      -k, --keyring=FILE     Specify a keyring file.
          --known-notation=NOTATION NAME
                             Add a notation to the list of known notations.
          --partial          Equivalent to -a 40.
      -r, --trust-root=FINGERPRINT
                             One or more certificates to use as trust-roots.
          --time=TIMESTAMP   Reference time.
    Commands:
      authenticate  Authenticate the binding between a certificate and user ID.
      identify      Identify a certificate via its fingerprint by determining the
                      authenticity of its user IDs.
      list          Find all bindings that can be authenticated for all
                      certificates.
      lookup        Lookup authentic certificates by finding bindings for a given
                      user ID.
      path          Verify and lint a path.
      help          Displays help information about the specified command

    The README file of the pgpainless-wot-cli module contains instructions on how to build the executable.

    Future Improvements

    The current implementation still has potential for improvements and optimizations. For one, the Network object containing the result of many costly signature verifications is currently ephemeral and cannot be cached. In the future it would be desirable to change the network parsing code to be agnostic of reference time, including any verifiable signatures as edges of the network, even if those signatures are not yet – or no longer valid. This would allow us to implement some caching logic that could write out the network to disk, ready for future web of trust operations.

    That way, the network would only need to be re-created whenever the underlying certificate store is updated with new or changed certificates (which could also be optimized to only update relevant parts of the network). The query algorithm would need to filter out any inactive edges with each query, depending on the queries reference time. This would be far more efficient than re-creating the network with each application start.

    But why the Web of Trust?

    End-to-end encryption suffers from one major challenge: When sending a message to another user, how do you know that you are using the correct key? How can you prevent an active attacker from handing you fake recipient keys, impersonating your peer? Such a scenario is called Machine-in-the-Middle (MitM) attack .

    On the web, the most common countermeasure against MitM attacks are certificate authorities, which certify the TLS certificates of website owners, requiring them to first prove their identity to some extent. Let’s Encrypt for example first verifies, that you control the machine that serves a domain before issuing a certificate for it. Browsers trust Let’s Encrypt, so users can now authenticate your website by validating the certificate chain from the Let’s Encrypt CA key down to your website’s certificate.

    The Web-of-Trust follows a similar model, with the difference, that you are your own trust-root and decide, which CA’s you want to trust (which in some sense makes you your own “meta-CA”). The Web-of-Trust is therefore far more decentralized than the fixed set of TLS trust-roots baked into web browsers. You can use your own key to issue trust signatures on keys of contacts that you know are authentic. For example, you might have met Bob in person and he handed you a business card containing his key’s fingerprint. Or you helped a friend set up their encrypted communications and in the process you two exchanged fingerprints manually.

    In all these cases, in order to initiate a secure communication channel, you needed to exchange the fingerprint via an out-of-band channel. The real magic only happens, once you take into consideration that your close contacts could also do the same for their close contacts, which makes them CAs too. This way, you could authenticate Charlie via your friend Bob, of whom you know that he is trustworthy, because – come on, it’s Bob! Everybody loves Bob!

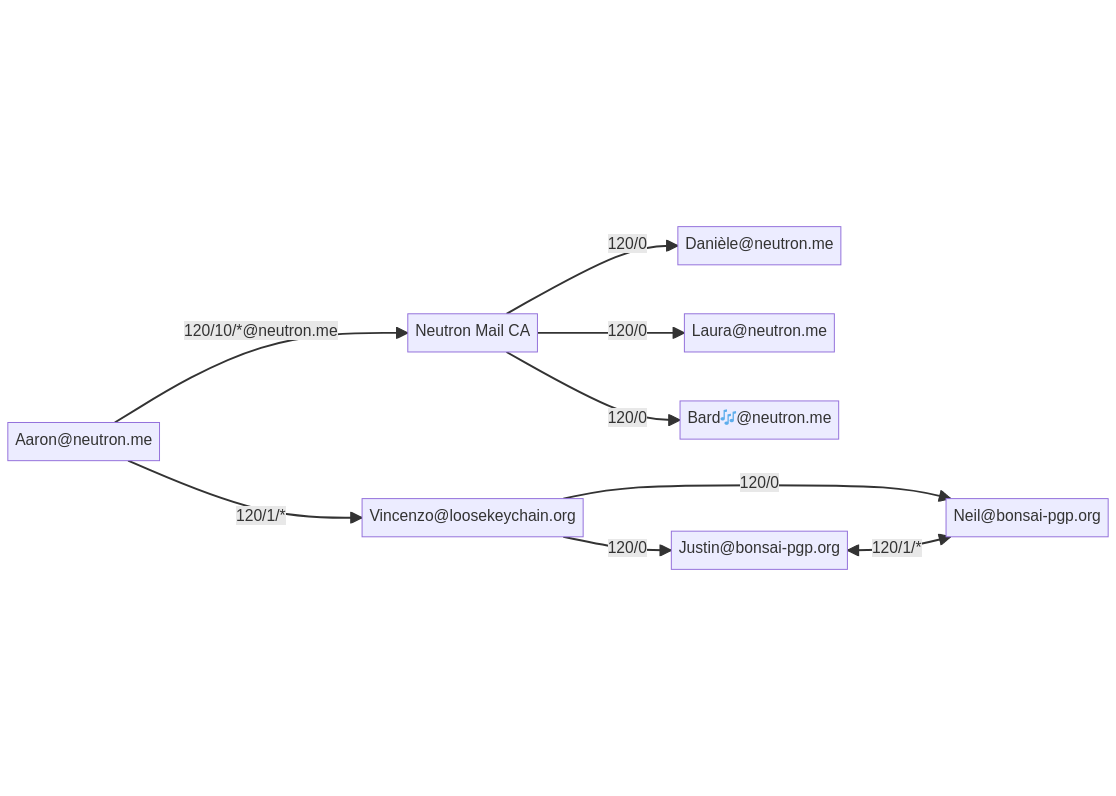
    An example OpenPGP Web-of-Trust Network diagram. An example for an OpenPGP Web-of-Trust. Simply by delegating trust to the Neutron Mail CA and to Vincenzo, Aaron is able to authenticate a number of certificates.

    The Web-of-Trust becomes really useful if you work with people that share the same goal. Your workplace might be one of them, your favorite Linux distribution’s maintainer team, or that non-Profit organization/activist collective that is fighting for a better tomorrow. At work for example, your employer’s IT department might use a local CA (such as an instance of the OpenPGP CA ) to help employees to communicate safely. You trust your workplace’s CA, which then introduces you safely to your colleagues’ authentic key material. It even works across business’ boundaries, e.g. if your workplace has a cooperation with ACME and you need to establish a safe communication channel to an ACME employee. In this scenario, your company’s CA might delegate to the ACME CA, allowing you to authenticate ACME employees.

    As you can see, the Web-of-Trust becomes more useful the more people are using it. Providing accessible tooling is therefore essential to improve the overall ecosystem. In the future, I hope that OpenPGP clients such as MUAs (e.g. Thunderbird) will embrace the Web-of-Trust.

    • wifi_tethering open_in_new

      This post is public

      blog.jabberhead.tk /2023/07/25/pgpainless-meets-the-web-of-trust/