phone

    • chevron_right

      JMP: SMS Account Verification

      news.movim.eu / PlanetJabber · Sunday, 19 February, 2023 - 03:49 · 4 minutes

    Some apps and services (but not JMP!) require an SMS verification code in order to create a new account.  (Note that this is different from using SMS for authentication; which is a bad idea since SMS can be easily intercepted , are not encrypted in transit , and are vulnerable to simple swap scams , etc.; but has different incentives and issues.)  Why do they do this, and how can it affect you as a user?

    Tarpit

    In the fight against service abuse and SPAM, there are no sure-fire one-size-fits-all solutions.  Often preventing abusive accounts and spammers entirely is not possible, so targets turn to other strategies, such as tarpits .  This is anything that slows down the abusive activity, thus resulting in less of it.  This is the best way to think about most account-creation verification measures.  Receiving an SMS to a unique phone number is something that is not hard for most customers creating an account.  Even a customer who does not wish to give out their phone number or does not have a phone number can (in many countries, with enough money) get a new cell phone and cell phone number fairly quickly and use that to create the account.

    If a customer is expected to be able to pass this check easily, and an abuser is indistiguishable from a customer, then how can any SMS verification possibly help prevent abuse?  Well, if the abuser needs to create only one account, it cannot.  However, in many cases an abuser is trying to create tens of thousands of accounts.  Now imagine trying to buy ten thousand new cell phones at your local store every day.  It is not going to be easy.

    “VoIP Numbers”

    Now, JMP can easily get ten thousand new SMS-enabled numbers in a day.  So can almost any other carrier or reseller.  If there is no physical device that needs to be handed over (such as with VoIP , eSIM , and similar services), the natural tarpit is gone and all that is left is the prices and policies of the provider.  JMP has many times received requests to help with getting “10,000 numbers, only need them for one day”.  Of course, we do not serve such customers.  JMP is not here to facilitate abuse, but to help create a gateway to the phone network for human beings whose contacts are still only found there.  That doesn’t mean there are no resellers who will work with such a customer, however.

    So now the targets are in a pickle if they want to keep using this strategy.  If the abuser can get ten thousand SMS-enabled numbers a day, and if it doesn’t cost too much, then it won’t work as a tarpit at all!  So many of them have chosen a sort of scorched-earth policy.  They buy and create heuristics to guess if a phone number was “too easy” to get, blocking entire resellers, entire carriers, entire countries.  These rules change daily, are different for every target, and can be quite unpredictable.  This may help when it comes to foiling the abusers, but is bad if you are a customer who just wants to create an account.  Some targets, especially “big” ones, have made the decision to lose some customers (or make their lives much more difficult) in order to slow the abusers down.

    De-anonymization

    Many apps and services also make money by selling your viewing time to advertisers (e.g. ads interspersed in a social media feed, as pre-/mid-roll in a video, etc.) based on your demographics and behaviour.  To do this, they need to know who you are and what your habits are so they can target the ads you see for the advertisers’ benefit.  As a result, they have an incentive to associate your activity with just one identity, and to make it difficult for you to separate your behaviour in ways that reduce their ability to get a complete picture of who you are.  Some companies might choose to use SMS verification as one of the ways they try to ensure a given person can’t get more than one account, or for associating the account (via the provided phone number) with information they can acquire from other sources, such as where you are at any given time .

    Can I make a new account with JMP numbers?

    The honest answer is, we cannot say.  While JMP would never work with abusers, and has pricing and incentives set up to cater to long-term users rather than those looking for something “disposable”, communicating that to every app and service out there is a big job.  Many of our customers try to help us with this job by contacting the services they are also customers of; after all, a company is more likely to listen to their own customers than a cold-call from some other company. The Soprani.ca project has a wiki page where users keep track of what has worked for them, and what hasn’t, so everyone can remain informed of the current state (since a service may work today, but not tomorrow, then work again next week, it is important to track success over time).

    Many customers use JMP as their only phone number, often ported in from their previous carrier and already associated with many online accounts.  This often works very well, but everyone’s needs are different.  Especially those creating new personas which start with a JMP number find that creating new accounts at some services for the persona can be frustrating to impossible.  It is an active area of work for us and all other small, easy-access phone network resellers.

    • wifi_tethering open_in_new

      This post is public

      blog.jmp.chat /b/2022-sms-account-verification

    • chevron_right

      Isode: Cobalt 1.3 Release Features

      news.movim.eu / PlanetJabber · Thursday, 9 February, 2023 - 13:42 · 2 minutes

    Cobalt 1.3 depends on M-Vault 19.0 or subsequent versions

    M-Vault Management Supporties

    • M-Vault Bootstrap.   Enables operation in conjunction with M-Vault 19.0 to support headless bootstrap.
    • Managing users in M-Vault groups, such as Directory Server Administrators  and Messaging Configuration Read/Write.  This enables Cobalt to control user and operator rights to access M-Vault.
    • AD/LDAP passthrough support
      • Allow users (per domain) to support mandatory or partial passthrough
      • Set and validate passthrough entry for user
      • Identify users in passthrough server that might be added to domain

    Messaging Management

    • Profile Editor for supporting and managing M-Switch Profiler.
      • SIC Coverage UI. Provide full list of SICS, showing which addresses each one goes to.   This enables operator to ensure that all SICs are sensibly handled.
    • File Transfer By Email capability is now managed by Cobalt, replacing capability previously in MConsole.
    • For Organizations and Military DLs enable control manage capability functions:
      • Max Message Size
      • Max Line Length (for ACP 127 destinations)
      • Charset Restrictions (for ACP 127 destinations)
      • Allows/block attachments
    • Option to show for a user which DLs the user is in, and give easy addition to other DLs.  This facilitates managing DL membership.

    New Views

    • Non-Human Users (Special Users).  Need to support accounts with passwords that are not humans.   For XMPP, Email or both.
    • View for end users, rather than administrators.  User can:
      • Change password.
      • See all of own entry and modify  attributes.   The list of modifiable attributes can be configured.
      • See references to entry and email list membership.
    • User Groups, to enable management of directory groups (Distinguished Names).

    Cobalt Access Control

    • New Cobalt roles, that can enable selective control of which users can access directory admin controls, and which users can set OAUTH rights and can add OAUTH Clients.
    • Restrict Password set/change rights, so that only selected Cobalt administrators can do this.

    Security Enhancements

    • When deleting a user, remove the password.   This will make it safe for applications searching whole DIT as you can’t authenticate with a deleted user’s account.
    • Security Clearance can be selected for any role or user, based on a configured catalogue.  This supports key M-Switch and Harrier feature to check clearances.

    Miscellaneous

    • When assigning a new email, search entire DIT for conflicts, not just Cobalt area.   This  helps SASL resilience
    • Can add Photos to Routed UAs and Organizations.
    • Check References on Delete. Cobalt has a “References” button on user/role form that displays all references of a user/role.  On deleting, references are deleted as well.
    • Tool to check references to users in AD, so that when users in AD are deleted, dangling references can be picked up.
    • Remove default domain concept
    • On deletion of domain in Cobalt, give option to delete all the domain data
    • Option to end all  cobalt logged in sessions of an operator, to allow an operator to logout from all browsers with a single action
    • There is also an option for an operator with appropriate rights  to end sessions of another Cobalt operator.
    • wifi_tethering open_in_new

      This post is public

      www.isode.com /company/wordpress/cobalt-1-3-release-features/

    • chevron_right

      Erlang Solutions: Elixir, 7 steps to start your journey

      news.movim.eu / PlanetJabber · Thursday, 9 February, 2023 - 10:44 · 3 minutes

    Read this post in Spanish .

    Let’s talk about Elixir!

    Elixir is a functional programming language created by José Valim to build concurrent and scalable systems. It is defined as:

    “a dynamic, functional language for building scalable and maintainable applications”.

    https://elixir-lang.org/

    Its first version was released in 2012. Since then, new features and improvements have been added until its current version . It is a relatively young programming language that has established itself quickly due to its nice syntax and short learning curve. Also, it is supported by a technology that has been working since the eighties in production systems, the BEAM.

    Elixir runs on the BEAM, Erlang’s virtual machine.

    In a later blog post, we’ll go into more detail about the virtual machine. For now, I want to mention a few features that make the BEAM a solid technology and a fantastic choice for system development. For example:

    • It simultaneously supports millions of users and transactions.
    • It has a mechanism to detect failures and define strategies that allow a system to recover from them.
    • It has all the necessary elements to develop a system capable of operating without interruptions or, failing that, with the minimum of them.
    • It allows system updates in real-time without stopping and in an “invisible” way for end users.

    Elixir inherits all these properties from BEAM. Adding to it that-the language has a very nice syntax, it is easy to learn, there are many resources (blogs, podcasts, etc), and the community is very friendly. So creating a project from scratch to start practicing requires very little time and effort.

    I was introduced to Elixir by chance in 2018. The project I learned it with made me suffer a bit because it was a different experience than what I was used to until then. But once I got into the rhythm, it became pretty enjoyable. Sometime last year, I wondered what would have happened if I hadn’t discovered it by coincidence.

    Would Elixir have caught my attention on its own? Is it a recommended option for someone learning to program? Do you require previous experience?

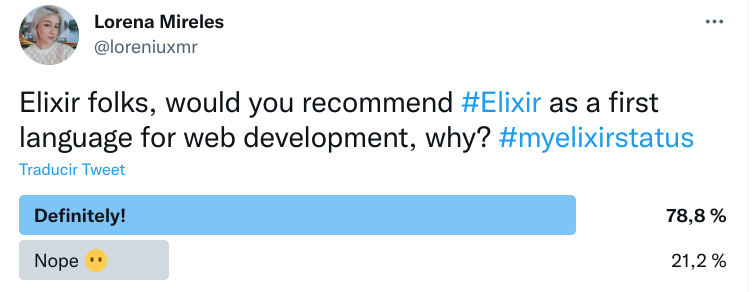
    So I posted a tweet asking other developers:

    Here are some answers :

    It is not easy to reach a definitive conclusion since choosing this language, as the first option will depend on the tastes and experiences of the individual. Some of its advantages are mentioned in the tweet replies, which motivated me to write this series.

    Without further ado, I welcome you to the series Elixir, 7 steps to start your journey.

    Throughout seven chapters, we’ll talk a bit about history, relevant technical aspects and delve into why Elixir has quickly gained popularity. I will also tell you a little about my experience in the projects in which I have participated.

    What topics will it cover?

    1. Erlang’s virtual machine, the BEAM
    2. Understanding processes and concurrency
    3. Libraries and frameworks
    4. Testing and debugging
    5. The Elixir Community
    6. Functional Programming vs. Object-Oriented Programming
    7. My first project with Elixir!

    Who is this series for?

    • People with no experience in any programming language looking for an option to explore.
    • People with previous experience in other programming languages who want to experiment with Elixir.

    Difficulty level: Beginner

    Elixir official documentation:

    In each chapter, I’ll share resources to dig deeper into the topics. You can find me on Twitter as @loreniuxmr to clarify questions or continue the conversation. You can also use the hashtags #MyElixirStatus and #Elixirlang  to find other Elixir developers.

    The next post will be about Erlang’s virtual machine, the BEAM, and why it is so relevant when it comes to Elixir. See you!

    The post Elixir, 7 steps to start your journey appeared first on Erlang Solutions .

    • chevron_right

      Erlang Solutions: Elixir, 7 pasos para iniciar tu viaje

      news.movim.eu / PlanetJabber · Thursday, 9 February, 2023 - 10:44 · 3 minutes

    ¡Hablemos de Elixir!

    Elixir es un lenguaje de programación funcional creado por José Valim para construi sistemas concurrentes y escalables.

    “a dynamic, functional language for building scalable and maintainable applications”.

    https://elixir-lang.org/

    Su primera versión fue liberada en 2012. Desde entonces, se le han agregado nuevas funcionalidades y mejoras hasta llegar a su versión actual . Se trata de un lenguaje de programación relativamente joven, pero bien establecido y que ha ganado aceptación rápidamente gracias su sintaxis agradable y una curva de aprendizaje corta. Elixir está respaldado por una tecnología que ha estado en funcionamiento en sistemas reales desde los años ochenta, la BEAM.

    Elixir corre sobre la máquina virtual de Erlang, la BEAM.

    Más adelante entraremos en más detalles y hablaremos de la máquina virtual. Por ahora me gustaría mencionar algunas características que hacen de la BEAM una tecnología sólida y una gran opción para el desarrollo de sistemas. Por ejemplo:

    • Soporta simultáneamente millones de usuarios y transacciones .
    • Tiene un mecanismo para detectar fallos y te permite definir estrategias para recuperarse de ellos.
    • Te brinda todos los elementos necesarios para desarrollar sistemas capaces de operar sin interrupciones o, en su defecto, con el mínimo de ellas.
    • Permite hacer actualizaciones de un sistema en tiempo real sin detenerlo, y de manera “invisible” para los usuarios finales.

    Elixir hereda todas estas propiedades de la BEAM. Y a eso le sumamos que el lenguaje tiene una sintaxis bastante agradable, es fácil de aprender, existen muchos recursos (blogs, podcasts, etc) y la comunidad es increíble. Así que crear un proyecto desde cero para practicar y aprender require de muy poco tiempo y esfuerzo.

    Conocí Elixir por casualidad en 2018. El proyecto con el que lo aprendí me hizo sufrir un poco, porque se trataba de un lenguaje totalmente diferente a los que había conocido hasta ese entonces (orientados a objetos) pero mi experiencia una vez que descubrí todo lo que había se volvió muy disfrutable. En algún momento del año pasado me pregunté qué hubiera pasado de no haberlo descubierto por coincidencia.

    ¿Me hubiera llamado la atención en algún momento? ¿Es una opción recomendada para alguien que está aprendiendo programación? ¿Requiere experiencia previa?

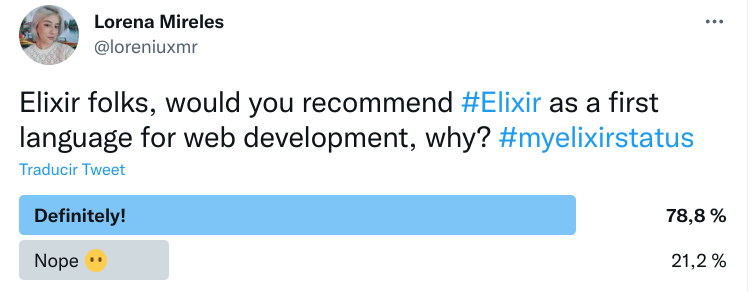
    Así que le pregunté en Twitter a otros desarrolladores :

    A continuación algunas respuestas:

    Es difícil llegar a una conclusión definitiva, pues escoger este lenguaje como primera opción o no dependerá de los gustos y la experiencia de cada quien. Algunas de las respuestas hablan acerca de las ventajas de este lenguaje de programación y fueron la razón que me motivo a escribir esta serie.

    Así que sin más que decir, bienvenido a Elixir, 7 pasos para iniciar tu viaje.

    A lo largo de siete capítulos hablaremos un poco acerca de su historia, aspectos técnicos relevantes y por qué ha ganado popularidad rápidamente. También te contaré cómo ha sido mi experiencia en los proyectos en los que he participado.

    ¿Qué temas cubrirá?

    1. La máquina virtual de Erlang, la BEAM
    2. Entendiendo procesos y concurrencia
    3. Bibliotecas y frameworks
    4. Pruebas y debugging
    5. La comunidad de Elixir
    6. Programación funcional vs Programación orientada a objetos
    7. ¡Mi primer proyecto con Elixir!

    ¿A quién está dirigida esta serie?

    • Personas sin experiencia en ningún lenguaje de programación que están en busca de su primera opción para explorar.
    • Personas con experiencia previa en otros lenguajes de programación que quieran experimentar con Elixir.

    Nivel de dificultad: Principantes.

    Documentación oficial de Elixir:

    En cada capítulo te compartiré recursos para profundizar los temas. Puedes encontrarme en Twitter como @loreniuxmr para aclarar cualquier duda o seguir con la conversación. Y también puedes utilizar los siguientes hashtags para conectar con otros desarrolladores: #MyElixirStatus y #Elixirlang

    En la próxima nota hablaremos de la máquina virtual de Erlang, la BEAM y por qué es tan relevante cuando hablamos de Elixir. ¡Nos vemos!

    The post Elixir, 7 pasos para iniciar tu viaje appeared first on Erlang Solutions .

    • chevron_right

      Ignite Realtime Blog: Denial of Service Vulnerability in Smack 4.4 if XMPPTCPConnection is used with StAX

      news.movim.eu / PlanetJabber · Saturday, 3 December, 2022 - 14:42 · 2 minutes

    The fantastic folks behind Jitsi have discovered a Denial of Service (DoS) vulnerability in Smack ( JSA-2022-0002 , JSA-2022-0003 ), which is possible if a combination of Smack components is used. The root of the vulnerability is interesting because it is due to a countermeasure against DoS attacks, namely FEATURE_SECURE_PROCESSING of the Java API for XML Processing (JAXP).

    The DoS is possible because the older XMPPTCPConnection implementation of Smack parses the XMPP stream as one large XML document. Suppose the connection instance uses a parser where FEATURE_SECURE_PROCESSING is enabled. In that case, it is easy for an attacker to craft a stanza that triggers one of the various limits imposed by FEATURE_SECURE_PROCESSING, causing an exception, leaving the parser in an unrecoverable state, and closing the connection.

    This vulnerability was relatively recently introduced in Smack with the addition of the support for JAXP’s Streaming API for XML (StaX) parser. Historically, Smack only used XPP3 as XML pull parser. The default implementation of XPP3 is a fast, lightweight, and, to the best of our knowledge, secure parser. XPP3 is used, for example, by Android. However, with version 4.4.0 ( SMACK-591 ), Smack gained support for using Java’s Streaming API for XML (StAX) in addition to XPP3, to facilitate code-reuse on Java SE platforms and avoiding the XPP3 dependency.

    So this DoS is possible if the XMPP connection is of type XMPPTCPConnection and if the Smack connection instance uses a StAX parser for XMPP parsing.

    On a related note, Smack’s newer modular connection architecture is not affected by this, because it splits the individual top-level XMPP stream elements and parses them as standalone document. The splitting is done very early in the input processing step by XmlSplitter (of jxmpp ), which also enforces size limits for the XML elements. Therefore, the DoS is not possible over connections that are established via Smack’s modern ModularXmppClientToServerConnection .

    If you are affected, then the following countermeasures are possible:

    1. Relax the FEATURE_SECURE_PROCESSING_LIMITS
    2. Switch to XPP3 (smack-xmlparser-xpp3)
    3. Use ModularXmppClientToServerConnection

    Option A has the drawback that it is only possible to relax the limits globally. That is, it will affect XML processing regardless if Smack or some other component performs it. If you still want to go down that route, then

    System.setProperty("jdk.xml.entityExpansionLimit", "0")
    System.setProperty("jdk.xml.maxOccurLimit", "0")
    System.setProperty("jdk.xml.elementAttributeLimit", "0")
    System.setProperty("jdk.xml.totalEntitySizeLimit", "0")
    System.setProperty("jdk.xml.maxXMLNameLimit", "524288")
    System.setProperty("jdk.xml.entityReplacementLimit", "0")
    

    1 post - 1 participant

    Read full topic

    • wifi_tethering open_in_new

      This post is public

      discourse.igniterealtime.org /t/denial-of-service-vulnerability-in-smack-4-4-if-xmpptcpconnection-is-used-with-stax/92314

    • chevron_right

      Gajim: Gajim 1.5.4

      news.movim.eu / PlanetJabber · Saturday, 3 December, 2022 - 00:00 · 1 minute

    Gajim 1.5.4 comes with a reworked file transfer interface, better URL detection, message selection improvements, and many fixes under the hood. Thank you for all your contributions!

    What’s New

    Gajim’s interface for sending files has been reworked, and should be much easier to use now. For each file you’re about to send, Gajim will generate a preview. This way, you can avoid sending the wrong file to somebody. Regardless of how you start a file transfer, be it drag and drop, pasting a screen shot, or simply clicking the share button, you’ll always be able to check what you’re about to send.

    Gajim’s new file transfer interface

    Gajim’s new file transfer interface

    More Changes

    • Performance: Chat history is now displayed quicker
    • Support for Jingle XTLS has been dropped, since it hasn’t been standardized
    • geo:-URIs are now prettier (thanks, @mjk )
    • Dependencies: pyOpenSSL has been replaced by python-cryptography

    Fixes

    • Fixes for message selection
    • Improvements for recognizing URLs ( @mjk )
    • Many fixes to improve Gajim’s usability

    Over 20 issues have been fixed in this release. Have a look at the changelog for a complete list.

    Gajim

    As always, don’t hesitate to contact us at gajim@conference.gajim.org or open an issue on our Gitlab .

    • wifi_tethering open_in_new

      This post is public

      gajim.org /post/2022-12-03-gajim-1.5.4-released/

    • chevron_right

      Erlang Solutions: Advent of Code 2022 – Every Puzzle Solved in Erlang

      news.movim.eu / PlanetJabber · Thursday, 1 December, 2022 - 10:33 · 9 minutes

    Day 1

    Christmas is getting closer and with that, the annual Advent of Code begins. For those who do not know, Advent of Code is a fun and inclusive event which provides a new programming puzzle every day. The fun is that these puzzles can be solved in any programming language and are accessible for varying levels of coding experience and skills. The real test is in your problem-solving. This year, we’ll be solving each of the problems in Erlang and publishing the results. We hope you enjoy it – if you’ve come up with a different solution and want to discuss it with us, we encourage you to comment on Twitter.

    The code will be added to the repo here: https://github.com/aleklisi/AdventOfCode2022 as I manage to solve each next puzzle.

    Day 1

    Full problem description: https://adventofcode.com/2022/day/1

    The example input file:

    1000
    2000
    3000
    
    4000
    
    5000
    6000
    
    7000
    8000
    9000
    
    10000
    

    Puzzle 1

    We are given a file with a list of values for calories in snacks carried by elves. The Elves take turns writing down the number of Calories contained in the various snacks that they’ve brought with them, one item per line . Each Elf separates its own inventory from the previous Elf’s inventory (if any) by a blank line. So the first task is to read and parse the data and decide how to represent it.

    I decided to represent the input as a list of two-element tuples, where each tuple stores the elf’s number and a list of snacks. Here is an example data representation for the example file:

    [
      {1,[1000,2000,3000]},
      {2,[4000]},
      {3,[5000,6000]},
      {4,[7000,8000,9000]},
      {5,[10000]}
    ]
    

    Now we just need to define a max function, which compares elements based on the sum of elements in a list of the calories in the snacks. I assumed that the list of elves is not empty, so I start with its first element as the current max and then started comparisons with other elves. Every time I find an elf with a bigger calorie sum I replace my current elf with the new one so that I will end up with the elf with the highest calorie total. Once the elf with the most calories is found, we can return the sum of calories.
    See the code: https://github.com/aleklisi/AdventOfCode2022/blob/main/day1_puzzle1/src/day1_puzzle1.erl#L48-L56 .

    Puzzle 2

    The only difference in puzzle 2 compared to puzzle 1 is that now we need to find 3 elves with the most calories total instead of just 1 elf and sum their calories altogether.

    We can heavily rely on solutions from puzzle 1.

    To find the top 3 elves I will just:

    1. Find the elf with the highest calories and save this elf as the first one.
    2. Remove the first elf from the list of elves.
    3. Find the next top elf with the highest calories from the list of elves (without the first elf) and save this elf as the second one.
    4. Remove the second elf from the list of elves.
    5. Find the next top elf with the highest calories from the list of elves (without the first and second elf) and save this elf as the third one.
    6. Return the sum of calories of the first, second and third elf.

    Voila!

    Day 2

    Day 2 of Advent of Code sees us helping the Elves to score a game of Rock, Paper, Scissors. The Elves have provided us with a strategy guide and it’s our job to help them score their game.

    Puzzle 1

    To complete the task we need to calculate the results of the above games. Since the games are unrelated (the result of previous games does not impact the next games, the best way to approach the problem is to start by implementing a single game’s score count function and then map a list of games with this function, to get the scores for each of the games. To get the final score (which is a sum of the games’ scores) we then sum all of the elements of the list.

    The data structure I decided to use to represent a single game is a two element tuple, where the first element is the opponent’s move and the second element is my move.

    The list of games is parsed into something like this:

    [{rock, rock},
                  {scissors, rock},
                  {scissors, rock},
                  {scissors, rock},
                  {paper, paper},
    	…
    ]
    

    Looking back (after solving the problem) I could have used maps with a structure like the one below:

    	#{my_move = > rock, opponent_move => paper}
    

    It might have helped me debug and avoid errors, which I did when first approaching the problem. That error was to confuse my move with my opponent’s move. In other words, I decoded A, B and C to be my moves and  X, Y, and Z to be my opponent’s moves. It is an obvious mistake when you spot it, but easy oversight when reading the puzzle’s description fast. I obviously had to read the description carefully 2 more times to spot my mistake, so as we say in Polish: “the cunning one loses twice”.

    Both parsing and solving today’s puzzle heavily rely on pattern matching, so let’s see that in action.

    Firstly, let’s take a look at how the data is decoded using pattern matching:

    % "The first column is what your opponent is going to play:
    % A for Rock,
    % B for Paper,
    % C for Scissors.
    translate_opponent_move("A") -> rock;
    translate_opponent_move("B") -> paper;
    translate_opponent_move("C") -> scissors.
    
    % The second column, you reason, must be what you should play in response:
    % X for Rock,
    % Y for Paper,
    % Z for Scissors.
    translate_my_move("X") -> rock;
    translate_my_move("Y") -> paper;
    translate_my_move("Z") -> scissors.
    

    A smart observer might notice that I could have used a single function to handle that translation, but I find dividing the decoding into two separate functions much more readable.

    Now let’s take a look at how scoring can be conveniently calculated:

    count_games_score({OpponentMove, MyMove}) ->
        count_shape_score(MyMove) + count_result_score(OpponentMove, MyMove).
    
    % The score for a single round is the score for the shape you selected (
    % 1 for Rock,
    % 2 for Paper,
    % 3 for Scissors
    count_shape_score(rock) -> 1;
    count_shape_score(paper) -> 2;
    count_shape_score(scissors) -> 3.
    
    % ) plus the score for the outcome of the round (
    % 0 if you lost,
    % 3 if the round was a draw, 
    % 6 if you won
    % ).
    count_result_score(rock, scissors) -> 0;
    count_result_score(paper, rock) -> 0;
    count_result_score(scissors, paper) -> 0;
    count_result_score(OpponentMove, MyMove) when MyMove == OpponentMove -> 3;
    count_result_score(scissors, rock) -> 6;
    count_result_score(rock, paper) -> 6;
    count_result_score(paper, scissors) -> 6.
    

    Again a keen observer might notice that it could be done in a single function, but I think most people will agree that translating the specifications one-to-one is way more convenient and much easier to understand and possibly debug if the need arises.

    The solution can be found here: https://github.com/aleklisi/AdventOfCode2022/tree/main/day2_puzzle1

    Puzzle 2

    Puzzle two introduces a plot twist. It turns out that the second part of the input for each of the games is not what we are supposed to play, but the expected game result. We need to figure out what to play, based on what our opponent’s move is and the expected result. Notice that the game score count does not change, so if we determine what we have played based on the new understanding of input and provide parsing output to follow the same rules as we did in today’s puzzle 1 when doing the parsing, the rest of the code should work correctly without any change.

    Let’s now see how to achieve that in practice.

    In the `read_and_parse_data/1` function I modified the anonymous function inside a map function to translate the predicted result into my move:

            fun(RawGame) ->
                [OpponentMoveRaw, GameResultRaw] = string:split(RawGame, " "),
                OpponentMove = translate_opponent_move(OpponentMoveRaw),
                GameResult = translate_result(GameResultRaw),
                MyMove = find_my_move(OpponentMove, GameResult),
                {OpponentMove, MyMove}
            end

    And this is the implementation of the translating functions:

    % "The first column is what your opponent is going to play:
    % A for Rock,
    % B for Paper,
    % C for Scissors.
    translate_opponent_move("A") -> rock;
    translate_opponent_move("B") -> paper;
    translate_opponent_move("C") -> scissors.
    
    % The second column says how the round needs to end:
    % X means you need to lose,
    % Y means you need to end the round in a draw,
    % Z means you need to win.
    translate_result("X") -> lose;
    translate_result("Y") -> draw;
    translate_result("Z") -> win.
    
    find_my_move(OpponentMove, draw) -> OpponentMove;
    find_my_move(rock, lose) -> scissors;
    find_my_move(paper, lose) -> rock;
    find_my_move(scissors, lose) -> paper;
    find_my_move(rock, win) -> paper;
    find_my_move(paper, win) -> scissors;
    find_my_move(scissors, win) -> rock.
    

    Again they heavily rely on pattern matching.

    The solution can be found here: https://github.com/aleklisi/AdventOfCode2022/tree/main/day2_puzzle2

    Conclusions after completing day 2

    Firstly, ALWAYS carefully read the requirements, and do not skip any part, because you find it “obvious”.

    Secondly, pattern matching is a great tool to have, it allows us to easily implement readable code.

    And last but not least, if you struggle or get stuck with something, it helps to add readable printing/logging to your code. When my implementation of `find_my_move/2` function (when solving puzzle 2) did not work. I added the following printing debug to the parsing data function:

    
    …
    MyMove = find_my_move(OpponentMove, GameResult),
                io:format("OpponentMoveRaw: ~p\t", [OpponentMoveRaw]),
                io:format("OpponentMove: ~p\t", [OpponentMove]),
                io:format("GameResultRaw: ~p\t", [GameResultRaw]),
                io:format("MyMove: ~p\t", [MyMove]),
                io:format("GameResult: ~p\t", [GameResult]),
                io:format("Result Score: ~p\n", [count_games_score({OpponentMove, MyMove})]),
                {OpponentMove, MyMove}
    …
    

    Which for the test file:

    A X
    A Y
    A Z
    B X
    B Y
    B Z
    C X
    C Y
    C Z
    

    Results with the following output:

    OpponentMoveRaw: "A"	OpponentMove: rock	GameResultRaw: "X"	MyMove: scissors		GameResult: lose	Result Score: 3
    OpponentMoveRaw: "A"	OpponentMove: rock	GameResultRaw: "Y"	MyMove: rock		GameResult: draw	Result Score: 4
    OpponentMoveRaw: "A"	OpponentMove: rock	GameResultRaw: "Z"	MyMove: paper		GameResult: win	Result Score: 8
    OpponentMoveRaw: "B"	OpponentMove: paper	GameResultRaw: "X"	MyMove: rock		GameResult: lose	Result Score: 1
    OpponentMoveRaw: "B"	OpponentMove: paper	GameResultRaw: "Y"	MyMove: paper		GameResult: draw	Result Score: 5
    OpponentMoveRaw: "B"	OpponentMove: paper	GameResultRaw: "Z"	MyMove: scissors		GameResult: win	Result Score: 9
    OpponentMoveRaw: "C"	OpponentMove: scissors	GameResultRaw: "X"	MyMove: paper		GameResult: lose	Result Score: 2
    OpponentMoveRaw: "C"	OpponentMove: scissors	GameResultRaw: "Y"	MyMove: scissors		GameResult: draw	Result Score: 6
    OpponentMoveRaw: "C"	OpponentMove: scissors	GameResultRaw: "Z"	MyMove: rock		GameResult: win	Result Score: 7
    

    Which I found extremely helpful when finding the mistake. It turned out that instead of:

    % …
    find_my_move(rock, lose) -> scissors;
    find_my_move(paper, lose) -> rock;
    find_my_move(scissors, lose) -> paper;
    % …
    

    I had:

    % …
    find_my_move(rock, lose) -> paper;
    find_my_move(paper, lose) -> rock;
    find_my_move(scissors, lose) -> paper;
    % …
    

    In the event that I was unable to locate my mistake, I would recommend implementing unit tests, hoping not to duplicate the mistake there.

    That’s it for day 2. Come back on Monday for the solutions to the weekend’s puzzles as well as Monday’s solution.

    The post Advent of Code 2022 – Every Puzzle Solved in Erlang appeared first on Erlang Solutions .

    • chevron_right

      Erlang Solutions: RabbitMQ – An Amazing Message Broker

      news.movim.eu / PlanetJabber · Thursday, 1 December, 2022 - 10:29 · 6 minutes

    In cloud architectures (or microservices), applications are broken down into smaller independent blocks that can be quickly developed, deployed, and maintained. Imagine you have a cloud architecture that has many services and many requests per second, you have to make sure that no requests are lost and your web service is always ready to receive new requests instead of locked by processing the previous request and must ensure that the services communicate with each other smoothly and efficiently.

    So how do you? How can different applications communicate with each other? The answer is Message Broker!

    Nowadays, there are many Message Broker software that can be listed as AWS Simple Queue Service (SQS), Apache Kafka, Apache ActiveMQ,… But the most popular among the names listed above are RabbitMQ!

    So, What is a message broker? What is RabbitMQ? Why use RabbitMQ?
    Your concerns will be answered by the RabbitMQ team right in the article!


    What is a Message Broker?

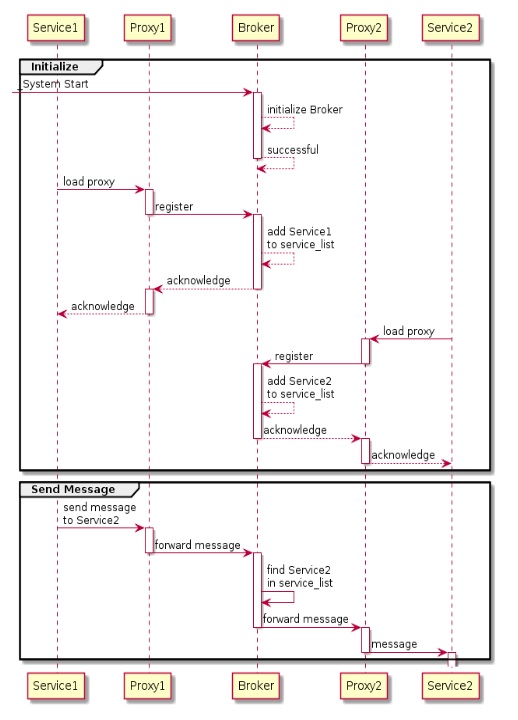
    A message broker (an integration broker or interface engine) is an intermediary module that transfers messages from sender to receiver. It is an architectural pattern for inspecting, relaying, and navigating messages; mediating between applications, simplifying communication between them, and maximizing the efficiency of splitting into smaller blocks. The main task of a Message broker is to receive messages from applications and perform some action. Let’s take a look at the sequence diagram below:

    How does Message Broker work?

    During the Initialize process, Service1 and Sevice2 load the proxy and register to the Broker. From there, the Broker will forward the messages to the pre-registered proxy.
    The advantages can see here are:

    • Service1 and Service2 don’t need to know each other and don’t need to speak in the same language. They just need to send the message to the proxy, and from here proxy will forward the message to the Broker. The Broker will take care of validating, transforming, and routing messages between Service1 and Service2.
    • With this design pattern, we can set up \an asynchronous mechanism. Service1 doesn’t need to care when a message is delivered to Service2 and when Service2 finishes handling the message, everything Sevice1 should do is send the message to the Broker, Service2 will pick up the message whenever it wants.

    To put it simply, a message broker is an intermediary program developed to serve the needs of easy communication between different applications. You can also understand message broker as a message broker software program.

    Some highlights about RabbitMQ

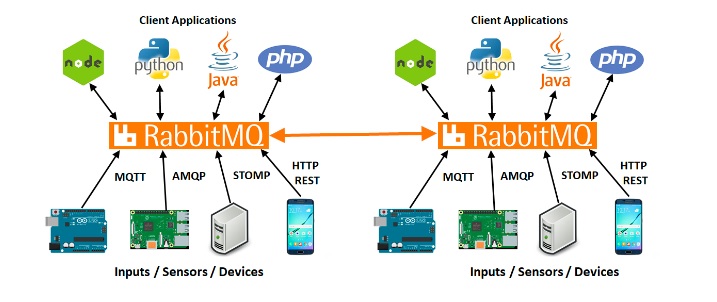
    RabbitMQ is an open-source message broker. In the beginning, it was used for Advanced Message Queueing Protocol (AMQP), and after that growing up to support the Streaming Text Oriented Messaging Protocol (STOMP), Message Queuing Telemetry Transport (MQTT), and other protocols.

    In a word, RabbitMQ is like an intermediary message carrier or queue manager. RabbitMQ presented in Erlang language gives programmers an intermediary means to exchange data between members of the system and securely stores the data before it is pushed to another location.

    It can be understood simply, as a large-scale system, the exchange of messages between components is more and more complex. Therefore, RabbitMQ was born as an effective solution in the system structure. Not only that, but the capacity of RabbitMQ is also quite light, programmers can deploy it on both fixed and cloud environments.

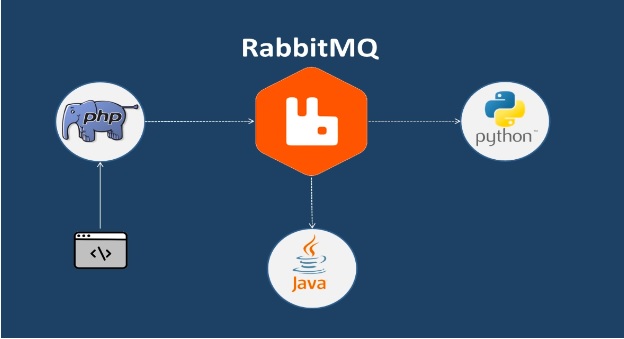
    RabbitMQ also supports multiple Messaging protocols, develops in a distributed, federated environment, and meets the need for scalability. RabbitMQ also provides a wide range of tools for the most popular languages such as C++, C#, Java, PHP, Python,…

    The most outstanding features of RabbitMQ

    As the software of choice is used so much, it must contain many outstanding features:

    • Interface :

    RabbitMQ has a fairly simple interface, easy to use. Users can easily manage, monitor and control all problems in the programs.

    • Reliability :

    RabbitMQ offers a variety of features to let you trade off performance with reliability, including persistence, delivery acknowledgments, publisher confirms, and high availability.

    • When a connection fails, messages may be in transit between the client and server. They may be stuck in the middle of being decoded or encoded on either side, stuck in the TCP buffer, … In such events, messages in transit will not be delivered, they will need to be retransmitted. The RabbitMQ Acknowledgements and Confirms feature will let the server and clients know when to do this.
    • RabbitMQ can detect dead TCP connections with the Heartbeats feature.
    • With some messaging protocols supported by RabbitMQ, applications can control the durability of queues and messages . In order to avoid losing messages, durable queue is the recommended option, and messages are published as persistent by publishers (Delivery mode property).
    • In a RabbitMQ cluster, all definitions (of exchanges, bindings, users, etc) are replicated across the entire cluster. Queues may be located on a single node, or replicate their content for higher availability.

    Quorum queues is a modern replicated queue type that focuses on data safety. They provide a more understandable, in some cases less resource intensive, new implementation for achieving replicated queues and high availability.

    Streams is another replicated messaging data type that allows for repeatable consumption.

    • Flexibility:

    The message is routed through the Exchange before reaching the Queue. RabbitMQ provides some commonly used Exchange types, we can also define our own Exchange as a plugin. For more complex routing you can bind exchanges together .

    RabbitMQ enables users to control the trade-offs between messages, throughput, and performance. All the messages in the queues can specify where they should be saved to a disc before their delivery. Queues in a cluster can span multiple servers while ensuring that no messages are lost in the case of a server failure.

    • Multi-protocol, the multi-language feature creates a diversity of users.
    • Lightweight:

    RabbitMQ is lightweight and requires less than 40MB of RAM to run the application core and plugins like the Management UI.

    • High availability of queues:

    With queues in RabbitMQ, users can replicate it on several different machines in the same cluster. This will help to keep the messages safe even if the hardware fails.

    • Traceability :

    If messaging is not working properly, RabbitMQ will step in and take action. Thanks to its traceability , users can track the system’s operating status or tell if the system has any problems.

    • Plugins system :

    RabbitMQ also supports plugin extension through many forms. If you have the ability, you can also create these utilities yourself. For more information on how to develop a RabbitMQ Plugin, please refer to the Plugin Development Basics page.

    • Commercial Services :

    Support sales with training and consulting programs offered on Pivotal.

    RabbitMQ’s application

    RabbitMQ can be used when the web server needs to quickly respond to requests. This eliminates the need to perform resource-intensive operations while the user waits for results. RabbitMQ is also used to transport messages to many different recipients for processing or to share the load among highly loaded workers (20K+ messages/sec).

    RabbitMQ can be used for:

    • Applications need to support legacy protocols, such as STOMP, MQTT, AMQP, 0-9-1.
    • Fine-grained control over consistency/set of guarantees on a per-message basis
    • Complex routing to consumers
    • Applications need multiple to publish/subscribe, point-to-point request/reply messaging capabilities.

    Who is using RabbitMQ?

    RabbitMQ is an open-source tool with 10.1K GitHub stars and 3.7K GitHub forks. Here’s a link to RabbitMQ’s open-source repository on GitHub .

    Explore RabbitMQ’s Story .

    1972 companies reportedly use RabbitMQ in their tech stacks, including Robinhood, Reddit, and Tech Stack .

    Reference resources

    https://www.rabbitmq.com/

    https://github.com/rabbitmq/rabbitmq-server

    https://www.erlang-solutions.com/blog/an-introduction-to-rabbitmq-what-is-rabbitmq/

    https://www.erlang-solutions.com/blog/rabbitmq-quorum-queues-explained-what-you-need-to-know/

    The post RabbitMQ – An Amazing Message Broker appeared first on Erlang Solutions .

    • chevron_right

      JMP: Writing a Chat Client from Scratch

      news.movim.eu / PlanetJabber · Thursday, 1 December, 2022 - 04:23 · 28 minutes

    There are a lot of things that go into building a chat system, such as client, server, and protocol.  Even for only making a client there are lots of areas of focus, such as user experience, features, and performance.  To keep this post a manageable size, we will just be building a client and will use an existing server and protocol (accessing Jabber network services using the XMPP protocol).  We’ll make a practical GUI so we can test things, but not spend too much time on polish, and look at getting to a useful baseline of features.

    You can find all the code for this post in git .  All code licensed AGPL3+ .

    Use a Library

    As with most large programming tasks, if we wanted to do every single thing ourselves we would spend a lot more time, so we should find some good libraries.  There is another reason to use a library: any improvements we make to the library benefits others.  While releasing our code might help someone else if they choose to read it, a library improvement can be picked up by users of that library right away.

    We need to speak the XMPP protocol so let’s choose Blather .  We need a GUI so we can see this working, but don’t really want to futz with it much so let’s choose Glimmer .  The code here will use these libraries and be written in the Ruby programming language, but these ideas are general purpose to the task and hopefully we won’t get too bogged down in syntax specifics.

    One little language-specific thing you will need to create is a description of which ruby packages are being used, so let’s make that file (named Gemfile ):

    Gemfile

    source "https://rubygems.org"
    
    gem "blather", git: "https://github.com/adhearsion/blather", branch: "develop"
    gem "glimmer-dsl-libui", "~> 0.5.24"

    Run this to get the packages installed:

    bundle install --path=.gems

    Let’s get the bare minimum: a connection to a Jabber service and a window.

    client.rb

    require "glimmer-dsl-libui"
    require "blather/client"
    
    BLATHER = self
    include Glimmer
    
    Thread.new do
    	window("Contacts") {
    		on_destroy {
    			BLATHER.shutdown
    		}
    	}
    end

    When required in this way, Blather will automatically set up a connection with event processing on the main thread, and will process command line arguments to get connection details.  So we put the GUI on a second thread to not have them block each other.  When the window is closed ( on_destroy ), be sure to disconnect from the server too.  You can run this barely-a-client like this:

    bundle exec ruby client.rb user@example.com password

    The arguments are a Jabber ID (which you can get from many existing services ), and the associated password.

    You should get a blank window and no errors in your terminal.  If you wanted to you could even look in another client and confirm that it is connected to the account by seeing it come online.

    Show a Contact List

    Let’s fetch the user’s contacts from the server and show them in the window (if you use this with a new, blank test account there won’t be any contacts yet of course, but still).

    $roster = [["", ""]]
    
    Thread.new do
    	window("Contacts") {
    		vertical_box {
    			table {
    				button_column("Contact") {
    				}
    				editable false
    				cell_rows $roster
    			}
    		}
    
    		on_destroy {
    			BLATHER.shutdown
    		}
        }.show
    end
    
    after(:roster) do
    	LibUI.queue_main do
    		$roster.clear
    		my_roster.each do |item|
    			$roster << [item.name || item.jid, item.jid]
    		end
    	end
    end

    In a real app you would probably want some kind of singleton object to represent the contacts window and the contact list (“roster”) etc.  For simplicity here we just use a global variable for the roster, starting with some dummy data so that the GUI framework knows what it will look like, etc.

    We fill out the window from before a little bit to have a table with a column of buttons, one for each contact.  The button_column is the first (and in this case, only) column definition so it will source data from the first element of each item in cell_rows .  It’s not an editable table, and it gets its data from the global variable.

    We then add an event handler to our XMPP connection to say that once the roster has been loaded from the server, we hand control over to the GUI thread and there we clear out the global variable and fill it up with the roster as we now see it.  The first item in each row is the name that will be shown on the button (either item.name or item.jid if there is no name set), the second item is the Jabber ID which won’t be shown because we didn’t define that column when we made the window.  Any updates to the global variable will be automatically painted into the GUI so we’re done.

    One Window Per Conversation

    For simplicity, let’s say we want to show one window per conversation, like so:

    $conversations = {}
    
    class Conversation
    	include Glimmer
    
    	def self.open(jid, m=nil)
    		return if $conversations[jid]
    
    		($conversations[jid] = new(jid, m)).launch
    	end
    
    	def initialize(jid, m=nil)
    		@jid = jid
    		@messages = [["", ""]]
    		new_message(m) if m
    	end
    
    	def launch
    		window("Conversation With #{@jid}") {
    			vertical_box {
    				table {
    					text_column("Sender")
    					text_column("Message")
    					editable false
    					cell_rows @messages
    					@messages.clear
    				}
    
    				horizontal_box {
    					stretchy false
    
    					@message_entry = entry
    					button("Send") {
    						stretchy false
    
    						on_clicked do
    							BLATHER.say(@jid, @message_entry.text)
    							@messages << [ARGV[0], @message_entry.text]
    							@message_entry.text = ""
    						end
    					}
    				}
    			}
    
    			on_closing do
    				$conversations.delete(@jid)
    			end
    		}.show
    	end
    
    	def format_sender(jid)
    		BLATHER.my_roster[jid]&.name || jid
    	end
    
    	def message_row(m)
    		[
    			format_sender(m.from&.stripped || BLATHER.jid.stripped),
    			m.body
    		]
    	end
    
    	def new_message(m)
    		@messages << message_row(m)
    	end
    end
    
    message :body do |m|
    	LibUI.queue_main do
    		conversation = $conversations[m.from.stripped.to_s]
    		if conversation
    			conversation.new_message(m)
    		else
    			Conversation.open(m.from.stripped.to_s, m)
    		end
    	end
    end

    Most of this is the window definition again, with a table of the messages in this conversation sourced from an instance variable @messages .  At the bottom of the window is an entry box to type in text and a button to trigger sending it as a message.  When the button is clicked, send that message to the contact this conversation is with, add it to the list of messages so that it shows up in the GUI, and make the entry box empty again.  When the window closes ( on_closing this time because it’s not the “main” window) delete the object from the global set of open conversations.

    This object also has a helper to open a conversation window if there isn’t already one with a given Jabber ID (jid), some helpers to format message objects into table rows by extracting the sender and body (including format_sender which gets the roster item if there is one, uses &.name to get the name if there was a roster item or else nil , and if there was no roster item or no name just show jid ) and a helper that adds new messages into the GUI.

    Finally we add a new XMPP event handler for incoming messages that have a body.  Any such incoming message we look up in the global if there is a conversation open already, if so we pass the new message there to have it appended to the GUI table, otherwise we open the conversation with this message as the first thing it will show.

    Getting from the Contact List to a Conversation

    Now we wire up the contact list to the conversation view:

    button_column("Contact") {
    	on_clicked do |row|
    		Conversation.open($roster[row][1].to_s)
    	end
    }

    When a contact button is clicked, grab the Jabber ID from the hidden end of the table row that we had stashed there, and open the conversation.

    horizontal_box {
    	stretchy false
    
    	jid_entry = entry {
    		label("Jabber ID")
    	}
    
    	button("Start Conversation") {
    		stretchy false
    
    		on_clicked do
    			Conversation.open(jid_entry.text)
    		end
    	}
    }

    And let’s provide a way to start a new conversation with an address that isn’t a contact too.  An entry to type in a Jabber ID and a button that opens the conversation.

    Adding a Contact

    Might as well add a button to the main window that re-uses that entry box to allow adding a contact as well:

    button("Add Contact") {
    	stretchy false
    
    	on_clicked do
    		BLATHER.my_roster << jid_entry.text
    	end
    }

    Handling Multiple Devices

    In many chat protocols, it is common to have multiple devices or apps connected simultaneously. It is often desirable to show messages sent to or from one device on all the others as well.  So let’s implement that.  First, a helper for creating XML structures we may need:

    def xml_child(parent, name, namespace)
    	child = Niceogiri::XML::Node.new(name, parent.document, namespace)
    	parent << child
    	child
    end

    We need to tell the server that we support this feature:

    when_ready do
    	self << Blather::Stanza::Iq.new(:set).tap { |iq|
    		xml_child(iq, :enable, "urn:xmpp:carbons:2")
    	}
    end

    We will be handling live messages from multiple event handlers so let’s pull the live message handling out into a helper:

    def handle_live_message(m, counterpart: m.from.stripped.to_s)
    	LibUI.queue_main do
    		conversation = $conversations[counterpart]
    		if conversation
    			conversation.new_message(m)
    		else
    			Conversation.open(counterpart, m)
    		end
    	end
    end

    And the helper that will handle messages from other devices of ours:

    def handle_carbons(fwd, counterpart:)
    	fwd = fwd.first if fwd.is_a?(Nokogiri::XML::NodeSet)
    	return unless fwd
    
    	m = Blather::XMPPNode.import(fwd)
    	return unless m.is_a?(Blather::Stanza::Message) && m.body.present?
    
    	handle_live_message(m, counterpart: counterpart.call(m))
    end

    This takes in the forwarded XML object (allowing for it to be a set of which we take the first one) and imports it with Blather’s logic to become hopefully a Message object.  If it’s not a Message or has no body, we don’t really care so we stop there. Otherwise we can handle this extracted message as though we had received it ourselves.

    And then wire up the event handlers:

    message(
    	"./carbon:received/fwd:forwarded/*[1]",
    	carbon: "urn:xmpp:carbons:2",
    	fwd: "urn:xmpp:forward:0"
    ) do |_, fwd|
    	handle_carbons(fwd, counterpart: ->(m) { m.from.stripped.to_s })
    end

    Because XMPP is just XML, we can use regular XPath stuff to extract from incoming messages.  Here we say that if the message contains a forwarded element inside a carbons received element, then we should handle this with the carbons handler instead of just the live messages handler.  The XML that matches our XPath comes in as the second argument and that is what we pass to the handler to get converted into a Message object.

    message(
    	"./carbon:sent/fwd:forwarded/*[1]",
    	carbon: "urn:xmpp:carbons:2",
    	fwd: "urn:xmpp:forward:0"
    ) do |_, fwd|
    	handle_carbons(fwd, counterpart: ->(m) { m.to.stripped.to_s })
    end

    This handler is for messages sent by other devices instead of received by other devices.  It is pretty much the same, except that we know the “other side of the conversation” (here called counterpart) is in the to not the from.

    message :body do |m|
    	handle_live_message(m)
    end

    And our old message-with-body handler now just needs to call the helper.

    History

    So far our client only processes and displays live messages.  If you close the app, or even close a conversation window, the history is gone.  If you chat with another client or device, you can’t see that when you re-open this one.  To fix that we’ll need to store messages persistently, and also fetch any history from while we were disconnected from the server.  We will need a few more lines in our Gemfile first:

    gem "sqlite3"
    gem "xdg"

    And then to set up a basic database schema:

    require "securerandom"
    require "sqlite3"
    require "xdg"
    
    DATA_DIR = XDG::Data.new.home + "jabber-client-demo"
    DATA_DIR.mkpath
    DB = SQLite3::Database.new(DATA_DIR + "db.sqlite3")
    
    if DB.user_version < 1
    	DB.execute(<<~SQL)
    		CREATE TABLE messages (
    			mam_id TEXT PRIMARY KEY,
    			stanza_id TEXT NOT NULL,
    			conversation TEXT NOT NULL,
    			created_at INTEGER NOT NULL,
    			stanza TEXT NOT NULL
    		)
    	SQL
    	DB.execute("CREATE TABLE data (key TEXT PRIMARY KEY, value TEXT)")
    	DB.user_version = 1
    end

    user_version is a SQLite feature that allows storing a simple integer alongside the database.  It starts at 0 if never set, and so here we use it to check if our schema has been created or not.  We store the database in a new directory created according to the XDG Base Directory specification .  There are two relevant IDs for most XMPP operations: the MAM ID (the ID in the server’s archive) and the Stanza ID (which was usually selected by the original sender).  We also create a data table for storing basic key-value stuff, which we’ll use in a minute to remember where we have sync’d up to so far.  Let’s edit the Conversation object to store messages as we send them, updating the send button on_clicked handler:

    def message
    	Blather::Stanza::Message.new(@jid, @message_entry.text, :chat).tap { |m|
    		m.id = SecureRandom.uuid
    	}
    end

    on_clicked do
    	m = message
    	EM.defer do
    		BLATHER << m
    		DB.execute(<<~SQL, [nil, m.id, @jid, m.to_s])
    			INSERT INTO messages
    			(mam_id, stanza_id, conversation, created_at, stanza)
    			VALUES (?,?,?,unixepoch(),?)
    		SQL
    	end
    	@messages << message_row(m)
    	@message_entry.text = ""
    end

    When we send a message we don’t yet know the server’s archive ID, so we set that to nil for now.  We set mam_id to be the primary key, but SQLite allows multiple rows to have NULL in there so this will work.  We don’t want to block the GUI thread while doing database work so we use EM.defer to move this to a worker pool.  We also want to store messages when we receive them live, so add this to the start of handle_live_message :

    mam_id = m.xpath("./ns:stanza-id", ns: "urn:xmpp:sid:0").find { |el|
    	el["by"] == jid.stripped.to_s
    }&.[]("id")
    delay = m.delay&.stamp&.to_i || Time.now.to_i
    DB.execute(<<~SQL, [mam_id, m.id, counterpart, delay, m.to_s])
    	INSERT INTO messages (mam_id, stanza_id, conversation, created_at, stanza)
        VALUES (?,?,?,?,?)
    SQL

    Here we extract the server archive’s ID for the message (added by the server in a stanza-id with by="Your Jabber ID" ) and figure out what time the message was originally sent (usually this is just right now for a live message, but if it is coming from offline storage because every client was offline or similar, then there can be a “delay” set on it which we can use).  Now that we have stored the history of message we received we need to load them into the GUI when we start up a Conversation so add this at the end of initialize:

    EM.defer do
    	mam_messages = []
    	query = <<~SQL
    		SELECT stanza
    		FROM messages
    		WHERE conversation=?
    		ORDER BY created_at
    	SQL
    	DB.execute(query, [@jid]) do |row|
    		m = Blather::XMPPNode.import(
    			Nokogiri::XML.parse(row[0]).root
    		)
    		mam_messages << m
    	end
    
    	LibUI.queue_main do
    		mam_messages.map! { |m| message_row(m) }
    		@messages.replace(mam_messages + @messages)
    	end
    end

    In the worker pool we load up all the stored messages for the current conversation in order, then we take the XML stored as a string in the database and parse it into a Blather Message object.  Once we’ve done as much of the work as we can in we worker pool we use queue_main to switch back to the GUI thread and actually build the rows for the table and replace them into the GUI.

    With these changes, we are now storing all messages we see while connected and displaying them in the conversation.  But what about messages sent or received by other devices or clients while we were not connected?  For that we need to sync with the server’s archive, fetching messages at a reasonable page size from whatever we already have until the end.

    def sync_mam(last_id)
    	start_mam = Blather::Stanza::Iq.new(:set).tap { |iq|
    		xml_child(iq, :query, "urn:xmpp:mam:2").tap do |query|
    			xml_child(query, :set, "http://jabber.org/protocol/rsm").tap do |rsm|
    				xml_child(rsm, :max, "http://jabber.org/protocol/rsm").tap do |max|
    					max.content = (EM.threadpool_size * 5).to_s
    				end
    				next unless last_id
    
    				xml_child(rsm, :after, "http://jabber.org/protocol/rsm").tap do |after|
    					after.content = last_id
    				end
    			end
    		end
    	}
    
    	client.write_with_handler(start_mam) do |reply|
    		next if reply.error?
    
    		fin = reply.find_first("./ns:fin", ns: "urn:xmpp:mam:2")
    		next unless fin
    
    		handle_rsm_reply_when_idle(fin)
    	end
    end

    The first half of this creates the XML stanza to request a page from the server’s archive. We create a query with a max page size based on the size of our worker threadpool, and ask for messages only after the last known id (if we have one, which we won’t on first run). Then we use write_with_handler to send this request to the server and wait for a reply. The reply is sent after all messages have been sent down (sent seperately, not returned in this reply, see below), but we may still be processing some of them in the worker pool so we next create a helper to wait for the worker pool to be done:

    def handle_rsm_reply_when_idle(fin)
    	unless EM.defers_finished?
    		EM.add_timer(0.1) { handle_rsm_reply_when_idle(fin) }
    		return
    	end
    
    	last = fin.find_first(
    		"./ns:set/ns:last",
    		ns: "http://jabber.org/protocol/rsm"
    	)&.content
    
    	if last
    		DB.execute(<<~SQL, [last, last])
    			INSERT INTO data VALUES ('last_mam_id', ?)
    			ON CONFLICT(key) DO UPDATE SET value=? WHERE key='last_mam_id'
    		SQL
    	end
    	return if fin["complete"].to_s == "true"
    
    	sync_mam(last)
    end

    Poll with a timer until the worker pool is all done so that we aren’t fetching new pages before we have handled the last one.  Get the value of the last archive ID that was part of the page just processed and store it in the database for next time we start up.  If this was the last page (that is, complete="true" ) then we’re all done, otherwise get the next page.  We need to make sure we actually start this sync process inside the when_ready handler:

    last_mam_id = DB.execute(<<~SQL)[0]&.first
    	SELECT value FROM data WHERE key='last_mam_id' LIMIT 1
    SQL
    sync_mam(last_mam_id)

    And also, we need to actually handle the messages as they come down from the server archive:

    message "./ns:result", ns: "urn:xmpp:mam:2" do |_, result|
    	fwd = result.xpath("./ns:forwarded", ns: "urn:xmpp:forward:0").first
    	fwd = fwd.find_first("./ns:message", ns: "jabber:client")
    	m = Blather::XMPPNode.import(fwd)
    	next unless m.is_a?(Blather::Stanza::Message) && m.body.present?
    
    	mam_id = result.first["id"]&.to_s
    	# Can't really race because we're checking for something from the past
    	# Any new message inserted isn't the one we're looking for here anyway
    	sent = DB.execute(<<~SQL, [m.id])[0][0]
    		SELECT count(*) FROM messages WHERE stanza_id=? AND mam_id IS NULL
    	SQL
    	if sent < 1
    		counterpart = if m.from.stripped.to_s == jid.stripped.to_s
    			m.to.stripped.to_s
    		else
    			m.from.stripped.to_s
    		end
    		delay =
    			fwd.find_first("./ns:delay", ns: "urn:xmpp:delay")
    			&.[]("stamp")&.then(Time.method(:parse))
    		delay = delay&.to_i || m.delay&.stamp&.to_i || Time.now.to_i
    		DB.execute(<<~SQL, [mam_id, m.id, counterpart, delay, m.to_s])
    			INSERT OR IGNORE INTO messages
    			(mam_id, stanza_id, conversation, created_at, stanza)
    			VALUES (?,?,?,?,?)
    		SQL
    	else
    		DB.execute(<<~SQL, [mam_id, m.id])
    			UPDATE messages SET mam_id=? WHERE stanza_id=?
    		SQL
    	end
    end

    Any message which contains a MAM (server archive) result will get handled here.  Just like with carbons we extract the forwarded message and import, making sure it ends up as a Blather Message object with a body.

    Remember how when we stored a sent message we didn’t know the archive ID yet?  Here we check if there is anything in our database already with this stanza ID and no archive ID, if no we will insert it as a new message, but otherwise we can update the row we already have to store the server archive ID on it, which we now know.

    And with that, our client now stores and syncs all history with the server, to give the user a full view of their conversation no matter where or when it happened.

    Display Names

    If a user is added to the contact list with a name, we already show that name instead of their address in conversations.  What if a user is not a contact yet, or we haven’t set a name for them?  It might be useful to be able to fetch any display name they advertise for themselves and show that.  First we add a simple helper to expose write_with_handler outside of the main object:

    public def write_with_handler(stanza, &block)
    	client.write_with_handler(stanza, &block)
    end

    We need an attribute on the Conversation to hold the nickname:

    attr_accessor :nickname

    And then we can use this in Conversation#initialize to fetch the other side’s nickname if they advertise one and we don’t have one for them yet:

    self.nickname = BLATHER.my_roster[jid]&.name || jid
    return unless nickname.to_s == jid.to_s
    
    BLATHER.write_with_handler(
    	Blather::Stanza::PubSub::Items.new(:get).tap { |iq|
    		iq.node = "http://jabber.org/protocol/nick"
    		iq.to = jid
    	}
    ) do |reply|
    	self.nickname = reply.items.first.payload_node.text rescue self.nickname
    end

    Inside the window declaration we can use this as the window title:

    title <=> [self, :nickname]

    and in format_sender we can use this as well:

    return nickname if jid.to_s == @jid.to_s

    Avatars

    Names are nice, but what about pictures?  Can we have nice avatar images that go with each user?  What should we display if they don’t have an avatar set?  Well not only is there a protocol to get an avatar, but a specification that allows all clients to use the same colours to represent things, so we can use a block of that if there is no avatar set.  Let’s generate the colour blocks first.  Add this to Gemfile :

    gem "hsluv"

    Require the library at the top:

    require "hsluv"
    
    $avatars = {}

    And a method on Conversation to use this:

    def default_avatar(string)
    	hue = (Digest::SHA1.digest(string).unpack1("v").to_f / 65536) * 360
    	rgb = Hsluv.rgb_prepare(Hsluv.hsluv_to_rgb(hue, 100, 50))
    	rgba = rgb.pack("CCC") + "xff".b
    	image { image_part(rgba * 32 * 32, 32, 32, 4) }
    end

    This takes the SHA-1 of a string, unpacks the first two bytes as a 16-bit little-endian integer, converts the range from 0 to MAX_SHORT into the range from 0 to 360 for hue degrees, then passes to the library we added to convert from HSV to RGB colour formats.  The GUI library expects images as a byte string where every 4 bytes are 0 to 255 for red, then green, then blue, then transparency.  Because we want a square of all one colour, we can create the byte string for one pixel and then multiply the string by the width and height (multiplying a string by a number in Ruby make a new string with that many copies repeated) to get the whole image.

    In Conversation#initialize we can use this to make a default avatar on the dummy message row then the window first opens:

    @messages = [[default_avatar(""), "", ""]]

    And we will need to add a new column definition to be beginning of the table { block:

    image_column("Avatar")

    And actually add the image to message_row :

    def message_row(m)
    	from = m.from&.stripped || BLATHER.jid.stripped
    	[
    		$avatars[from.to_s] || default_avatar(from.to_s),
    		format_sender(from),
    		m.body
    	]
    end

    If you run this you should now see a coloured square next to each message.  We would now like to get actual avatars, so add this somewhere at the top level to advertise support for this:

    set_caps(
    	"https://git.singpolyma.net/jabber-client-demo",
    	[],
    	["urn:xmpp:avatar:metadata+notify"]
    )

    Then in the when_ready block make sure to send it to the server:

    send_caps

    And handle the avatars as they come in:

    pubsub_event(
    	"//ns:items[@node='urn:xmpp:avatar:metadata']",
    	ns: "http://jabber.org/protocol/pubsub#event"
    ) do |m|
    	id = m.items.first&.payload_node&.children&.first&.[]("id")
    	next $avatars.delete(m.from.stripped.to_s) unless id
    
    	path = DATA_DIR + id.to_s
    	key = m.from.stripped.to_s
    	if path.exist?
    		LibUI.queue_main { $avatars[key] = image(path.to_s, 32, 32) rescue nil }
    	else
    		write_with_handler(
    			Blather::Stanza::PubSub::Items.new(:get).tap { |iq|
    				iq.node = "urn:xmpp:avatar:data"
    				iq.to = m.from
    			}
    		) do |reply|
    			next if reply.error?
    
    			data = Base64.decode64(reply.items.first&.payload_node&.text.to_s)
    			path.write(data)
    			LibUI.queue_main { $avatars[key] = image(path.to_s, 32, 32) rescue nil }
    		end
    	end
    end

    When an avatar metadata event comes in, we check what it is advertising as the ID of the avatar for this user.  If there is none, that means they don’t have an avatar anymore so delete anything we may have in the global cache for them, otherwise create a file path in the same folder as the database based on this ID.  If that file exists already, then no need to fetch it again, create the image from that path on the GUI thread and set it into our global in-memory cache.  If the file does not exist, then use write_with_handler to request their avatar data.  It comes back Base64 encoded, so decode it and then write it to the file.

    If you run this you should now see avatars next to messages for anyone who has one set.

    Delivery Receipts

    The Internet is a wild place, and sometimes things don’t work out how you’d hope.  Sometimes something goes wrong, or perhaps just all of a user’s devices are turned off.  Whatever the reason, it can be useful to see if a message has been delivered to at least one of the intended user’s devices yet or not.  We’ll need a new database column to store that status, add after the end of the DB.user_version < 1 if block:

    if DB.user_version < 2
    	DB.execute(<<~SQL)
    		ALTER TABLE messages ADD COLUMN delivered INTEGER NOT NULL DEFAULT 0
    	SQL
    	DB.user_version = 2
    end

    Let’s advertise support for the feature:

    set_caps(
    	"https://git.singpolyma.net/jabber-client-demo",
    	[],
    	["urn:xmpp:avatar:metadata+notify", "urn:xmpp:receipts"]
    )

    We need to add delivery status and stanza id to the dummy row for the messages table:

    @messages = [[default_avatar(""), "", "", false, nil]]

    And make sure we select the status out of the database when loading up messages:

    SELECT stanza,delivered FROM messages WHERE conversation=? ORDER BY created_at

    And pass that through when building the message rows

    mam_messages << [m, row[1]]

    mam_messages.map! { |args| message_row(*args) }

    Update the messages table to expect the new data model:

    table {
    	image_column("Avatar")
    	text_column("Sender")
    	text_column("Message")
    	checkbox_column("Delivered")
    	editable false
    	cell_rows @messages
    	@messages.clear if @messages.length == 1 && @messages.first.last.nil?
    }

    And update the row builder to include this new data:

    def message_row(m, delivered=false)
    	from = m.from&.stripped || BLATHER.jid.stripped
    	[
    		$avatars[from.to_s] || default_avatar(from.to_s),
    		format_sender(from),
    		m.body,
    		delivered,
    		m.id
    	]
    end

    Inbound messages are always considered delivered, since we have them:

    def new_message(m)
    	@messages << message_row(m, true)
    end

    And a method to allow signalling that a delivery receipt should be displayed, using the fact that we now hide the stanza id off the end of the rows in the table to find the relevant message to update:

    def delivered_message(id)
    	row = @messages.find_index { |r| r.last == id }
    	return unless row
    
    	@messages[row] = @messages[row][0..-3] + [true, id]
    end

    In the Send button’s on_clicked handler we need to actually request that others send us receipts:

    m = message
    xml_child(m, :request, "urn:xmpp:receipts")

    And we need to handle the receipts when they arrive:

    message "./ns:received", ns: "urn:xmpp:receipts" do |m, received|
    	DB.execute(<<~SQL, [received.first["id"].to_s])
    		UPDATE messages SET delivered=1 WHERE stanza_id=?
    	SQL
    
    	conversation = $conversations[m.from.stripped.to_s]
    	return unless conversation
    
    	LibUI.queue_main do
    		conversation.delivered_message(received.first["id"].to_s)
    	end
    end

    When we get a received receipt, we get the id attribute off of it, which represents a stanza ID that this receipt is for.  We update the database, and inform any open conversation window so the GUI can be updated.

    Finally, if someone requests a receipt from us we should send it to them:

    message :body do |m|
    	handle_live_message(m)
    
    	if m.id && m.at("./ns:request", ns: "urn:xmpp:receipts")
    		self << m.reply(remove_children: true).tap { |receipt|
    			xml_child(receipt, :received, "urn:xmpp:receipts").tap { |received|
    				received["id"] = m.id
    			}
    		}
    	end
    end

    If the stanza has an id and a receipt request, we construct a reply that contains just the received receipt and send it.

    Message Correction

    Sometimes people send a message with a mistake in it and want to send another to fix it.  It is convenvient for the GUI to support this and render only the new version of the message.  So let’s implement that.  First we add it to the list of things we advertise support for:

    set_caps(
    	"https://git.singpolyma.net/jabber-client-demo",
    	[],
    	[
    		"urn:xmpp:avatar:metadata+notify",
    		"urn:xmpp:receipts",
    		"urn:xmpp:message-correct:0"
    	]
    )

    Then we need a method on Conversation to process incoming corrections and update the GUI:

    def new_correction(replace_id, m)
    	row = @messages.find_index { |r| r.last == replace_id }
    	return unless row
    
    	@messages[row] = message_row(m, true)
    end

    We look up the message row on the stanza id, just as we did for delivery receipts, and just completely replace it with a row based on the new incoming message.  That’s it for the GUI.  Corrections may come from live messages, from carbons, or even from the server archive if they happened while we were disconnected, so we create a new insert_message helper to handle any case we previously did the SQL INSERT for an incoming message:

    def insert_message(
    	m,
    	mam_id:,
    	counterpart: m.from.stripped.to_s,
    	delay: m.delay&.stamp&.to_i
    )
    	if (replace = m.at("./ns:replace", ns: "urn:xmpp:message-correct:0"))
    		DB.execute(<<~SQL, [m.to_s, counterpart, replace["id"].to_s])
    			UPDATE messages SET stanza=? WHERE conversation=? AND stanza_id=?
    		SQL
    	else
    		delay ||= Time.now.to_i
    		DB.execute(<<~SQL, [mam_id, m.id, counterpart, delay, m.to_s])
    			INSERT OR IGNORE INTO messages
    			(mam_id, stanza_id, conversation, created_at, stanza, delivered)
    			VALUES (?,?,?,?,?,1)
    		SQL
    	end
    end

    The else case here is the same as the INSERTs we’ve been using up to this point, but we also check first for an element that signals this as a replacement and if that is the case we issue an UPDATE instead to correct our internal archive to the new version.

    Then in handle_live_message we also signal the possibly-open GUI:

    if (replace = m.at("./ns:replace", ns: "urn:xmpp:message-correct:0"))
    	conversation.new_correction(replace["id"].to_s, m)
    else
    	conversation.new_message(m)
    end

    We can now display incoming corrections, but it would also be nice to be able to send them.  Add a second button after the Send button in Conversation that can re-use the @message_entry box to correct the most recently sent message:

    button("Correct") {
    	stretchy false
    
    	on_clicked do
    		replace_row = @messages.rindex { |message|
    			message[1] == format_sender(BLATHER.jid.stripped)
    		}
    		next unless replace_row
    
    		m = message
    		m << xml_child(m, :replace, "urn:xmpp:message-correct:0").tap { |replace|
    			replace["id"] = @messages[replace_row].last
    		}
    		EM.defer do
    			BLATHER << m
    			DB.execute(<<~SQL, [m.to_s, @jid, @messages[replace_row].last])
    				UPDATE messages SET stanza=? WHERE conversation=? AND stanza_id=?
    			SQL
    		end
    		@messages[replace_row] = message_row(m, @messages[replace_row][-2])
    		@message_entry.text = ""
    	end
    }

    When the button is clicked we find the row for the most recently sent message, construct a message to send just as in the Send case but add the message correction replace child with the id matching the stanza id of the most recently sent message.  We send that message and also update our own local copy of the stanza both in the database and in the memory model rendered in the GUI.

    Conclusion

    There are a lot more features that a chat system can implement, but hopefully this gives you a useful taste of how each one can be incrementally layered in, and what the considerations might be for a wide variety of different kinds of features.  All the code for the working application developed in this article is available in git under AGPLv3+, with commits that corrospond to the path we took here .

    • wifi_tethering open_in_new

      This post is public

      blog.jmp.chat /b/2022-chat-client-from-scratch