It has been almost four years since my first article about scraping with Elixir and Crawly was published. Since then, many changes have occurred, the most significant being Erlang Solution’s blog design update. As a result, the 2019 tutorial is no longer functional.
This situation provided an excellent opportunity to update the original work and re-implement the Crawler using the new version of Crawly. By doing so, the tutorial will showcase several new features added to Crawly over the years and, more importantly, provide a functional version to the community. Hopefully, this updated tutorial will be beneficial to all.
First of all, why it’s broken now?
This situation is reasonably expected! When a website gets a new design, usually they redo everything—the new layout results in a new HTML which makes all old CSS/XPath selectors obselete, not even speaking about new URL schemes. As a result, the XPath/CSS selectors that were working before referred to nothing after the redesign, so we have to start from the very beginning. What a shame!
But of course, the web is done for more than just crawling. The web is done for people, not robots, so let’s adapt our robots!
Our experience from a large-scale scraping platform is that a successful business usually runs at least one complete redesign every two years. More minor updates will occur even more often, but remember that even minor updates harm your web scrapers.
Getting started
Usually, I recommend starting by following the Quickstart guide from
Crawly’s documentation pages
. However, this time I have something else in mind. I want to show you the Crawly standalone version.
Make it simple. In some cases, you need the data that can be extracted from a relatively simple source. In these situations, it might be quite beneficial to avoid bootstrapping all the Elixir stuff (new project, config, libs, dependencies). The idea is to deliver you data that other applications can consume without setting up.
Of course, the approach will have some limitations and only work for simple projects at this stage. Some may get inspired by this article and improve it so that the following readers will be amazed by new possibilities. In any case, let’s get straight to it now!
Bootstrapping 2.0
As promised, the simplified (compare it with the previous setup described
here
)version of the setup:
-
Create a directory for your project:
mkdir erlang_solutions_blog
-
Create a subdirectory that will contain the code of your spiders:
mkdir erlang_solutions_blog/spiders
-
Now, knowing that we want to extract the following fields:
title, author
,
publishing_date, URL, article_body
. Let’s define the following configuration for your project (erlang_solutions_blog/crawly.config):
[{crawly, [
   {closespider_itemcount, 100},
   {closespider_timeout, 5},
   {concurrent_requests_per_domain, 15},

   {middlewares, [
           'Elixir.Crawly.Middlewares.DomainFilter',
           'Elixir.Crawly.Middlewares.UniqueRequest',
           'Elixir.Crawly.Middlewares.RobotsTxt',
           {'Elixir.Crawly.Middlewares.UserAgent', [
               {user_agents, [
                   <<"Mozilla/5.0 (Macintosh; Intel Mac OS X x.y; rv:42.0) Gecko/20100101 Firefox/42.0">>,
                   <<"Mozilla/5.0 (X11; Linux x86_64) AppleWebKit/537.36 (KHTML, like Gecko) Chrome/51.0.2704.103 Safari/537.36">>
                   ]
               }]
           }
       ]
   },

   {pipelines, [
           {'Elixir.Crawly.Pipelines.Validate', [{fields, [title, author, publishing_date, url, article_body]}]},
           {'Elixir.Crawly.Pipelines.DuplicatesFilter', [{item_id, title}]},
           {'Elixir.Crawly.Pipelines.JSONEncoder'},
           {'Elixir.Crawly.Pipelines.WriteToFile', [{folder, <<"/tmp">>}, {extension, <<"jl">>}]}
       ]
   }]
}].
You probably have noticed that this looks like an Erlang configuration file, which is the case. I would say that it’s not the perfect solution, and one of the possible ways is to simplify it so it’s possible to configure the project more simply. If you have ideas — write me on Github’s discussions
https://github.com/elixir-crawly/crawly/discussions
.
4. The basic configuration is now done, and we can run the Crawly application, to see that we can start it this way:
docker run --name crawly
-d -p 4001:4001 -v $(pwd)/spiders:/app/spiders
-v $(pwd)/crawly.config:/app/config/crawly.config
oltarasenko/crawly:0.15.0
Notes:
-
4001 — is the default HTTP port used for spiders management, so we need to forward data to it
-
The spiders’ directory is an expected storage of spider files that will be added to the application later on.
-
Finally, the ugly configuration file is also mounted inside the Crawly container.
Now you can see the Crawly Management User interface on the localhost:4001
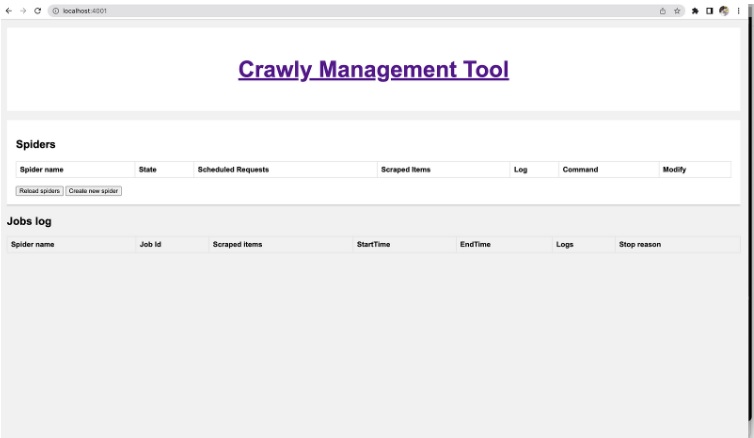
Crawly Management Tool
Working on a new spider
Now, let’s define the spider itself. Let’s start with the following boilerplate code (put it into
erlang_solutions_blog/spiders/esl.ex
):
defmodule ESLSpider do
 use Crawly.Spider

 @impl Crawly.Spider
 def init() do
   [start_urls: ["https://www.erlang-solutions.com/"]]
 end

 @impl Crawly.Spider
 def base_url(), do: "https://www.erlang-solutions.com"

 @impl Crawly.Spider
 def parse_item(response) do
   %{items: [], requests: []}
 end
end
This code defines an “ESLSpider ” module that uses the “Crawly.Spider” behavior.
The behavior requires three functions to be implemented:
teinit(), base_url(), and parse_item(response).
The “init()” function returns a list containing a single key-value pair. The key is “start_urls” and the value is a list containing a single URL string: “
https://www.erlang-solutions.com/
” This means that the spider will start crawling from this URL.
The “base_url()” function returns a string representing the base URL for the spider, used to filter out requests that go outside of erlang-solutions.com website.
The `parse_item(response)` function takes a response object as an argument and returns a map containing two keys: `items` and `requests`
Once the code is saved, we can run it via the Web interface (it will be required to re-start a docker container or click the
Reload
spiders
button in the Web interface).
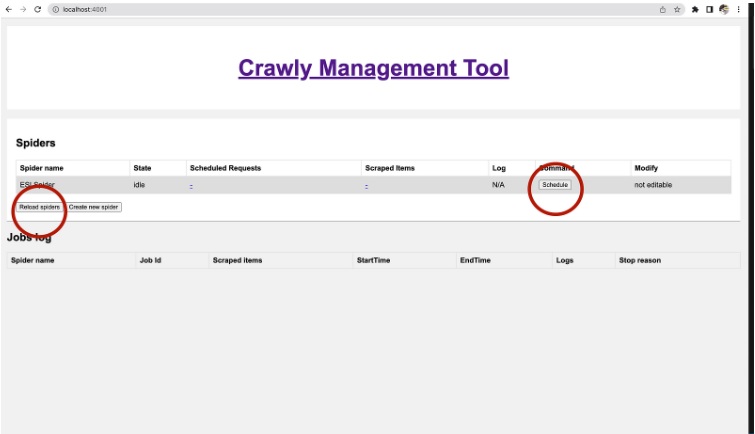
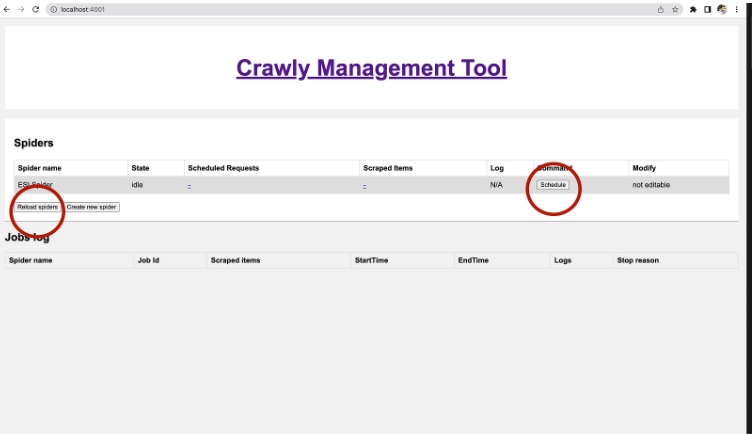
New Crawly Management UI
Once the job is started, you can review the
Scheduled Requests, Logs, or Extracted Items.
Parsing the page
Now we find CSS selectors to extract the needed data. The same approach is already described here
https://www.erlang-solutions.com/blog/web-scraping-with-elixir/
under extracting the data section. I think one of the best ways to find relevant CSS selectors is by just using Google Chrome’s inspect option:
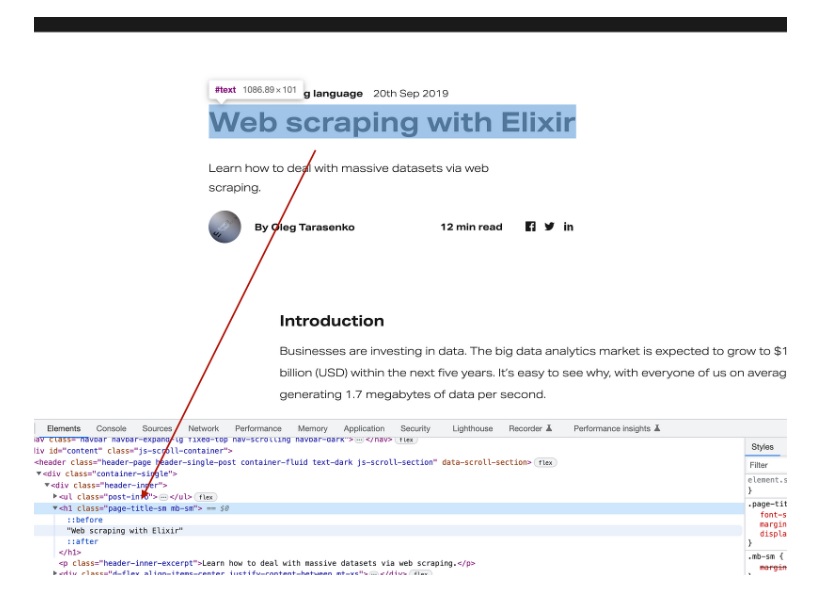
So let’s connect to the Crawly Shell and fetch data using the fetcher, extracting this title:
docker exec -it crawly /app/bin/crawly remote
1> response = Crawly.fetch("https://www.erlang-solutions.com/blog/web-scraping-with-elixir/")
2> document = Floki.parse_document!(response.body)
4> title_tag = Floki.find(document, ".page-title-sm")
[{"h1", [{"class", "page-title-sm mb-sm"}], ["Web scraping with Elixir"]}]
5> title = Floki.text(title_tag)
"Web scraping with Elixir"
We are going to extract all items this way. In the end, we came up with the following map of selectors representing the expected item:
item =
 %{
   url: response.request_url,
   title: Floki.find(document, ".page-title-sm") |> Floki.text(),
   article_body: Floki.find(document, ".default-content") |> Floki.text(),
   author: Floki.find(document, ".post-info__author") |> Floki.text(),
   publishing_date: Floki.find(document, ".header-inner .post-info .post-info__item span") |> Floki.text()
  }

requests = Enum.map(
 Floki.find(document, ".link-to-all") |> Floki.attribute("href"),
 fn url -> Crawly.Utils.request_from_url(url) end
)
At the end of it, we came up with the following code representing the spider:
defmodule ESLSpider do
 use Crawly.Spider

 @impl Crawly.Spider
 def init() do
   [
     start_urls: [
       "https://www.erlang-solutions.com/blog/web-scraping-with-elixir/",
       "https://www.erlang-solutions.com/blog/which-companies-are-using-elixir-and-why-mytopdogstatus/"
     ]
   ]
 end

 @impl Crawly.Spider
 def base_url(), do: "https://www.erlang-solutions.com"

 @impl Crawly.Spider
 def parse_item(response) do
   {:ok, document} = Floki.parse_document(response.body)

   requests = Enum.map(
     Floki.find(document, ".link-to-all") |> Floki.attribute("href"),
     fn url -> Crawly.Utils.request_from_url(url) end
     )

   item = %{
     url: response.request_url,
     title: Floki.find(document, ".page-title-sm") |> Floki.text(),
     article_body: Floki.find(document, ".default-content") |> Floki.text(),
     author: Floki.find(document, ".post-info__author") |> Floki.text(),
     publishing_date: Floki.find(document, ".header-inner .post-info .post-info__item span") |> Floki.text()
   }
   %{items: [item], requests: requests}
 end
end
That’s all, folks! Thanks for reading!
Well, not really. Let’s schedule this version of the spider again, and let’s see the results:
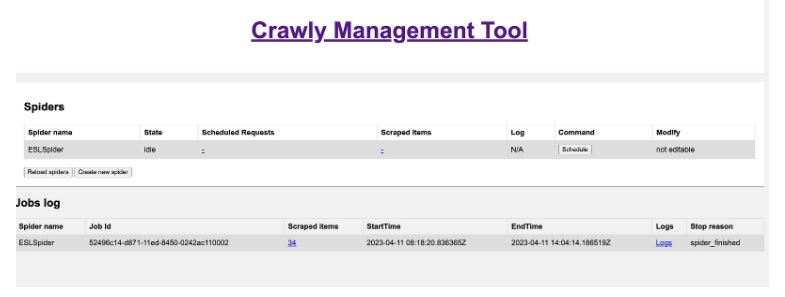
Scraping results
As you can see, the spider could only extract 34 items. This is quite interesting, as it’s pretty clear that Erlang Solution’s blog contains way more items. So why do we have only this amount? Can anything be done to improve it?
Debugging your spider
Some intelligent developers write everything just once, and everything works. Other people like me have to spend time debugging the code.
In my case, I start with exploring logs. There is something there I don’t like:
08:23:37.417 [info] Dropping item: %{article_body: “Scalable and Reliable Real-time MQTT Messaging Engine for IoT in the 5G Era.We work with proven, world leading technologies that provide a highly scalable, highly available distributed message broker for all major IoT protocols, as well as M2M and mobile applications.Available virtually everywhere with real-time system monitoring and management ability, it can handle tens of millions of concurrent clients.Today, more than 5,000 enterprise users are trusting EMQ X to connect more than 50 million devices.As well as being trusted experts in EMQ x, we also have 20 years of experience building reliable, fault-tolerant, real-time distributed systems. Our experts are able to guide you through any stage of the project to ensure your system can scale with confidence. Whether youâ€
 re hunting for a suspected bug, or doing due diligence to future proof your system, weâ€
re here to help. Our world-leading team will deep dive into your system providing an in-depth report of recommendations. This gives you full visibility on the vulnerabilities of your system and how to improve it. Connected devices play an increasingly vital role in major infrastructure and the daily lives of the end user. To provide our clients with peace of mind, our support agreements ensure an expert is on hand to minimise the length and damage in the event of a disruption. Catching a disruption before it occurs is always cheaper and less time consuming. WombatOAM is specifically designed for the monitoring and maintenance of BEAM-based systems (including EMQ x). This provides you with powerful visibility and custom alerts to stop issues before they occur. As well as being trusted experts in EMQ x, we also have 20 years of experience building reliable, fault-tolerant, real-time distributed systems. Our experts are able to guide you through any stage of the project to ensure your system can scale with confidence. Whether youâ€
re hunting for a suspected bug, or doing due diligence to future proof your system, weâ€
re here to help. Our world-leading team will deep dive into your system providing an in-depth report of recommendations. This gives you full visibility on the vulnerabilities of your system and how to improve it. Connected devices play an increasingly vital role in major infrastructure and the daily lives of the end user. To provide our clients with peace of mind, our support agreements ensure an expert is on hand to minimise the length and damage in the event of a disruption. Catching a disruption before it occurs is always cheaper and less time consuming. WombatOAM is specifically designed for the monitoring and maintenance of BEAM-based systems (including EMQ x). This provides you with powerful visibility and custom alerts to stop issues before they occur. Because itâ€
s written in Erlang!With itâ€
s Erlang/OTP design, EMQ X fuses some of the best qualities of Erlang. A single node broker can sustain one million concurrent connections…but a single EMQ X cluster – which contains multiple nodes – can support tens of millions of concurrent connections. Inside this cluster, routing and broker nodes are deployed independently to increase the routing efficiency. Control channels and data channels are also separated – significantly improving the performance of message forwarding. EMQ X works on a soft real-time basis. No matter how many simultaneous requests are going through the system, the latency is guaranteed.Hereâ€
s how EMQ X can help with your IoT messaging needs?Erlang Solutions exists to build transformative solutions for the worldâ€
s most ambitious companies, by providing user-focused consultancy, high tech capabilities and diverse communities. Letâ€
s talk about how we can help you.”, author: “”, publishing_date: “”, title: “”, url: “https://www.erlang-solutions.com/capabilities/emqx/”}. Reason: missing required fields
re hunting for a suspected bug, or doing due diligence to future proof your system, weâ€
re here to help. Our world-leading team will deep dive into your system providing an in-depth report of recommendations. This gives you full visibility on the vulnerabilities of your system and how to improve it. Connected devices play an increasingly vital role in major infrastructure and the daily lives of the end user. To provide our clients with peace of mind, our support agreements ensure an expert is on hand to minimise the length and damage in the event of a disruption. Catching a disruption before it occurs is always cheaper and less time consuming. WombatOAM is specifically designed for the monitoring and maintenance of BEAM-based systems (including EMQ x). This provides you with powerful visibility and custom alerts to stop issues before they occur. As well as being trusted experts in EMQ x, we also have 20 years of experience building reliable, fault-tolerant, real-time distributed systems. Our experts are able to guide you through any stage of the project to ensure your system can scale with confidence. Whether youâ€
re hunting for a suspected bug, or doing due diligence to future proof your system, weâ€
re here to help. Our world-leading team will deep dive into your system providing an in-depth report of recommendations. This gives you full visibility on the vulnerabilities of your system and how to improve it. Connected devices play an increasingly vital role in major infrastructure and the daily lives of the end user. To provide our clients with peace of mind, our support agreements ensure an expert is on hand to minimise the length and damage in the event of a disruption. Catching a disruption before it occurs is always cheaper and less time consuming. WombatOAM is specifically designed for the monitoring and maintenance of BEAM-based systems (including EMQ x). This provides you with powerful visibility and custom alerts to stop issues before they occur. Because itâ€
s written in Erlang!With itâ€
s Erlang/OTP design, EMQ X fuses some of the best qualities of Erlang. A single node broker can sustain one million concurrent connections…but a single EMQ X cluster – which contains multiple nodes – can support tens of millions of concurrent connections. Inside this cluster, routing and broker nodes are deployed independently to increase the routing efficiency. Control channels and data channels are also separated – significantly improving the performance of message forwarding. EMQ X works on a soft real-time basis. No matter how many simultaneous requests are going through the system, the latency is guaranteed.Hereâ€
s how EMQ X can help with your IoT messaging needs?Erlang Solutions exists to build transformative solutions for the worldâ€
s most ambitious companies, by providing user-focused consultancy, high tech capabilities and diverse communities. Letâ€
s talk about how we can help you.”, author: “”, publishing_date: “”, title: “”, url: “https://www.erlang-solutions.com/capabilities/emqx/”}. Reason: missing required fields
The line above indicates that the spider has dropped an article, which is not an article but is a general page. We want to exclude these URLs from the route of our bot.
Try to avoid creating unnecessary loads on a website when doing crawling activities.
The following lines can achieve this:
requests =
 Floki.find(document, ".link-to-all") |> Floki.attribute("href")
 |> Enum.filter(fn url -> String.contains?(url, "/blog/") end)
 |> Enum.map(&Crawly.Utils.request_from_url/1)
Now, we can re-run the spider and see that we’re not hitting non-blog pages anymore (don’t forget to reload the spider’s code)!
This optimised our crawler, but more was needed to extract more items. (Besides other things, it’s interesting to note that we can only get 35 articles from the “Keep reading” blog, which indicates some possible directions for improving the cross-linking inside the blog itself).
Improving the extraction coverage
When looking at the possibility of extracting more items, we should try finding a better source of links. One good way to do it is by exploring the blog’s homepage, potentially with JavaScript turned off. Here is what I can see:
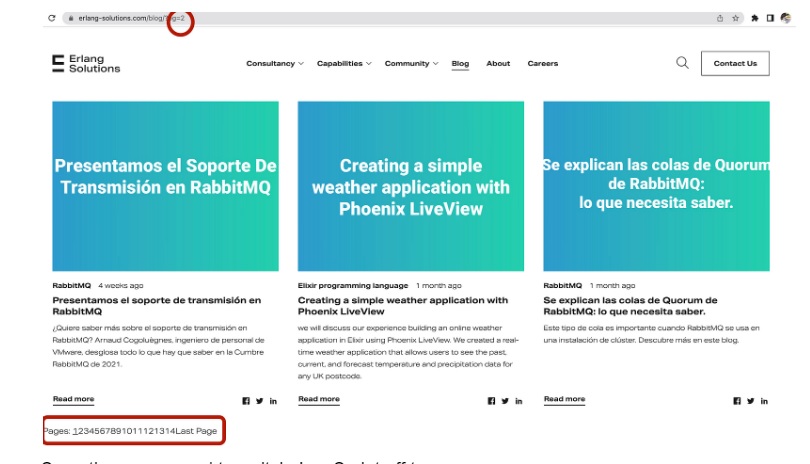
Sometimes you need to switch JavaScript off to see more.
As you can see, there are 14 Pages (only 12 of which are working), and every page contains nine articles. So we expect ~100–108 articles in total.
So let’s try to use this pagination as a source of new links! I have updated the init() function, so it refers the blog’s index, and also parse_item so it can use the information found there:
@impl Crawly.Spider
 def init() do
   [
     start_urls: [
       "https://www.erlang-solutions.com/blog/page/2/?pg=2",
       "https://www.erlang-solutions.com/blog/web-scraping-with-elixir/",
       "https://www.erlang-solutions.com/blog/which-companies-are-using-elixir-and-why-mytopdogstatus/"
     ]
   ]
 end

@impl Crawly.Spider
def parse_item(response) do
 {:ok, document} = Floki.parse_document(response.body)

 case String.contains?(response.request_url, "/blog/page/") do
   false -> parse_article_page(document, response.request_url)
   true -> parse_index_page(document, response.request_url)
 end
end

defp parse_index_page(document, _url) do
 index_pages =
   document
   |> Floki.find(".page a")
   |> Floki.attribute("href")
   |> Enum.map(&Crawly.Utils.request_from_url/1)

 blog_posts =
   Floki.find(document, ".grid-card__content a.btn-link")
   |> Floki.attribute("href")
   |> Enum.filter(fn url -> String.contains?(url, "/blog/") end)
   |> Enum.map(&Crawly.Utils.request_from_url/1)

   %{items: [], requests: index_pages ++ blog_posts }
end

defp parse_article_page(document, url) do
 requests =
   Floki.find(document, ".link-to-all")
   |> Floki.attribute("href")
   |> Enum.filter(fn url -> String.contains?(url, "/blog/") end)
   |> Enum.map(&Crawly.Utils.request_from_url/1)

 item = %{
   url: url,
   title: Floki.find(document, ".page-title-sm") |> Floki.text(),
   article_body: Floki.find(document, ".default-content") |> Floki.text(),
   author: Floki.find(document, ".post-info__author") |> Floki.text(),
   publishing_date: Floki.find(document, ".header-inner .post-info .post-info__item span") |> Floki.text()
 }
 %{items: [item], requests: requests}
Running it again
Now, finally, after adding all fixes, let’s reload the code and re-run the spider:
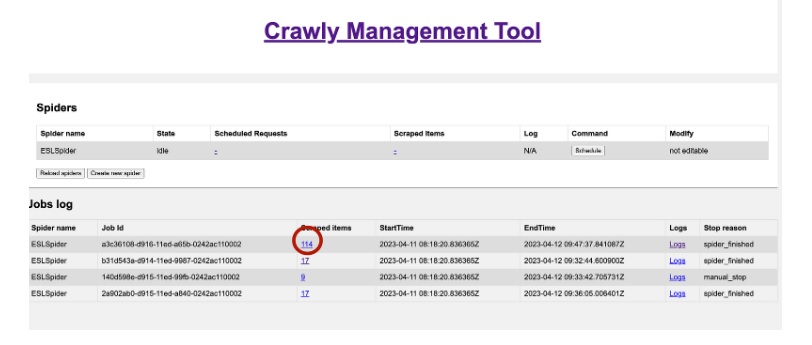
So as you can see, we have extracted 114 items, which looks quite close to what we expected!
Conclusion
Honestly speaking — running an open-source project is a complex thing. We have spent almost four years building Crawly and progressed quite a bit with the possibilities. Adding some bugs as well.
The example above shows how to run something with Elixir/Floki and a bit more complex process of debugging and fixing that sometimes appears in practice.
We want to thank Erlang Solutions for supporting the development and allocating help when needed!
The post
Re-implement our first blog scrapper with Crawly 0.15.0
appeared first on
Erlang Solutions
.


 chevron_right